•Sequences are VERTEX' timeline-based Playback Providers that are hosted by a Playback
•In a Sequence Clip Containers and Cues are arranged on various Tracks
•Sequences have a default Canvas, but every Clip Container can be assigned to a different Canvas or Output.
•A Sequence can be nested as Clip Container into another Sequence - similar to what you know from sub-compositions in other video compositing applications
Working with Sequences

Creating a new Sequence
•go to MAIN MENU > CREATE and select Sequence
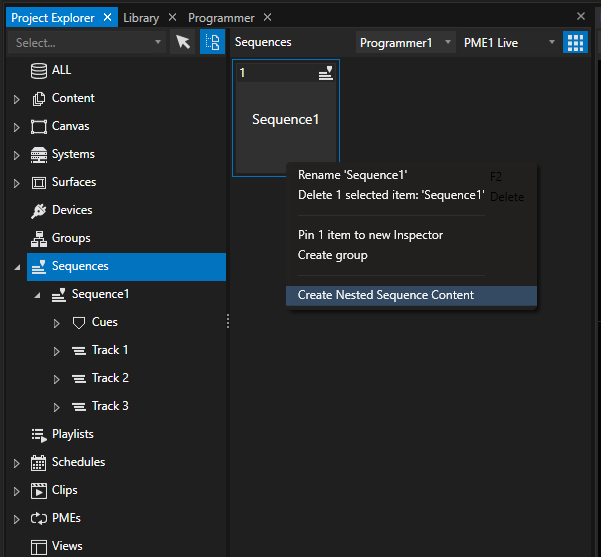
•go to Project Explorer, navigate to the Sequences Manager, access the context-menu (right-click) and select + Add new...
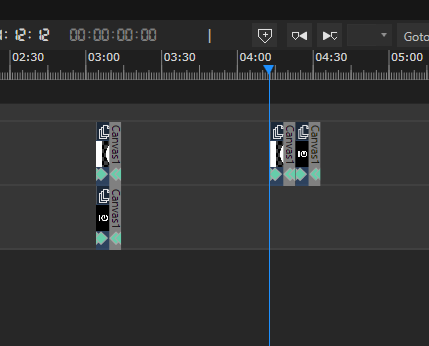
Clip Containers & Tracks
Clip Containers are - as the name suggests - containers that mainly hold your content clips.
The Tracks of a sequence aid you in arranging various Clip Containers and building your show.
Clip Containers can be positioned freely between different tracks at discretionary points in time - they are not 'glued' to a main storyline.
 View and zoom tips:
Use your mouse wheel to scroll up and down the tracks. Hold down CTRL while scrolling will zoom in and out (keys + and - also adjust the zoom) .
To scroll horizontally hold down SHIFT.
 Are Tracks the same as the layers I already know from other media server software?
No, Tracks are just ledges to arrange your Clip Containers on. While Tracks do have some proprietary settings, there is, however, no layer restriction like other media servers have.
Tracks and Clip Containers are flexible objects - such as the objects you may already know from video editing or compositing software.
Length and Frame Rate Grid
The default length of each Sequence is set to 10 minutes and can be customized in the Sequence's Inspector.
Find the category Playback Time and expand it with a click to adjust the settings.
The Sequence's FPS (frames per second) serves as a frame rate grid.
Change the grid to a time signature, if you need to arrange your content to musical beats.
Context Menu
Access the Sequence's context menu by right-click into the Playback editor for various options to select clip Containers, create or insert new Tracks or to create other items.
Access all items of a Sequence in Project Explorer

All Tracks, Cues and Clip Containers are also accessible as sub-elements in the Project Explorer
Use it to select items, to focus them into the Inspector or to delete them.
Lost a Clip Container?
Searching for a Clip Container that appears lost or is too small for manual selection on the timeline?
You can find and select it in the Project Explorer.
To reset the Clip Container to its default length, you need to open the context menu and select "Reset to Clip Length".
Cues
Cues are powerful tools aiding you in programming and controlling the playback of your sequence.
Go to the Cue-topic for further reading.
Sequence Settings
|
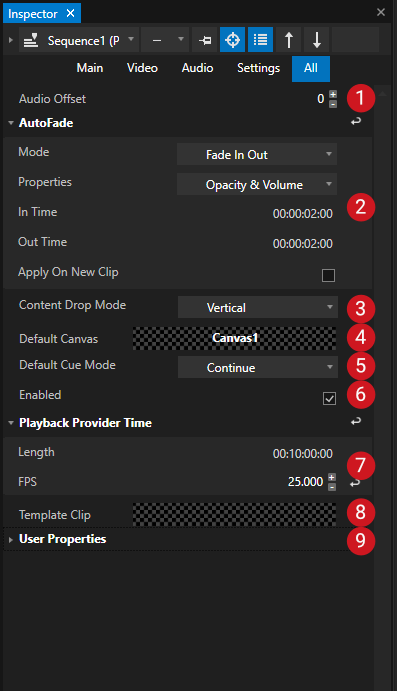
Sets the global behavior for an auto-generated keyframe at the first frame of a ClipContainer when adding keyframes in that Sequence. Keyframes at the start of a ClipContainer allow VERTEX to interpolate the values between the starting point and the values of the manually added keyframes. None: no first-frame keyframes will be added. Default: VERTEX adds a first-frame keyframe with an automatic default value (e.g. Opacity = 0) Input: VERTEX adds a first-frame keyframe. Its value will be matching the keyframe added by the user.
|
|
Audio Offset |
Audio Offset in milliseconds per Sequence. Positive values set audio earlier, negative values later in time. Please note: Audio Offset can also be adjusted globally in the System's Audio Settings. |
|
AutoFade |
Apply on new Clip - when enabled, VERTEX generates fade or transition keyframes for each new Clip Container in that Sequence. Mode: Select whether you need to fade in, fade out, or both. Properties: Select if either Opacity, or Volume or both shall be faded. In- and Out Time can be set to a desired duration. |
|
Clip Hold Time |
Sets a time in ms that determines how long a texture is being rendered after playhead has left the Clip Container. Common use cases: back-to-back clips with large file sizes where Clip Hold Time will prevent background flashes. |
|
Content Drop Mode |
Defines how multiple selections of content will be dropped onto your timeline when dragged from the Project Explorer. |
|
Default Clip Target |
Specifies the default target for each Clip Container created in that Sequence. By default it is set to Canvas1. Canvases, Destinations, System Outputs. Note: a Surface is not a valid target and the Clip will not be rendered. |
|
Default Cue Mode |
Each Cue added to that Sequence will have the selected mode by default. |
|
Default Cue Pre Roll Time |
Sets a default Pre Roll Time for each cue in that Sequence. When fading or jumping to a cue that is positioned over rendered content, Clips will be pre-loaded by default 02:00 seconds before their start time. |
|
Default Template Clip |
Sets a default Template Clip for each new ClipContainer generated in that Sequence. Each ClipContainer will have the template's settings applied. Exception: If a Sequence Track has got a default Template Clip of its own, it will override the Sequence's default. |
|
Default Track Geometry |
Sets a default Geometry file for each Track added. Each Clip Container added to the Tracks thereafter will use that default Geometry. |
|
Default Track Preset |
Sets a default Preset to each Track added. Each Clip Container added to the Tracks thereafter will use that default Preset. |
|
Default Track Template Clip |
If this property has got a Template Clip assigned, each Track added to the Sequence will use that Template for any Clip Container added therafter. Default Track Template Clip will override the Sequence's default Template Clip. |
|
Drag Drop Content To Playhead |
Enable this setting if you need content to automatically drop to the playhead's position. Regardless where your mouse actually drops it on the timeline, content will always snap to the playhead. |
|
Enabled |
Enables or disables the Sequence as a whole. |
|
Load GoTo Play Cue Wait Time (default = 01:00 seconds) |
When using the VERTEX script command GoToCuePlay, the transport will wait after jumping to the cue for the time set before resuming playback and thus allowing to buffer Clips that are not loaded yet. |
|
Pause & Play Scripts |
Users can enter scripts that will be run when the transport pauses or resumes play. |
|
|
|
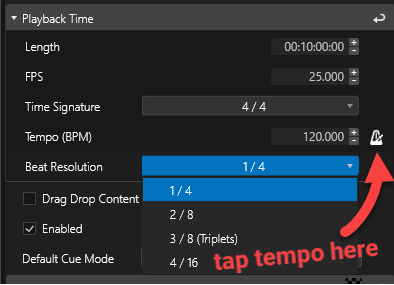
Length: Sets the length of your Sequence. The timeline will adapt to any changes set here. Time Signature: As soon as you divert from the default "None" and select a time signature (1/4, 2/4, 3/4, 4/4 or 5/4 time) a couple of musical properties will unlock. Also, the timeline grid will change from a frame based to beat based view. Tempo BPM: sets the sequence tempo in beats per minute. Alternatively, tap on the metronome button to any groove and let VERTEX calculate your tempo. Beat Resolution (default = quarter note): allows for sub-divisions of the quarter note beat in the Sequence's grid (eight notes, triplets, sixteenth notes). |
|
Customize the UI appearance (e.g. name, ID, color and notes) of your Sequence. |
 Changing the sequence's FPS may shift pre-existing cues!
All Cues that exist before changing the frame rate of a sequence will be shifted to the next frame according to the new grid.
Depending on your changes, this recalculation may cause a minimal shift in cues - please inspect all your cue times after changing the frame rate.
Advanced Settings
Change Inspector Mode to Advanced to display all advanced settings for a Sequence
Shortcuts
•Each editor window in VERTEX has got a varying set of shortcuts that are automatically created and updated.
•Press Shift-F1 to open a list of shortcuts corresponding to the current window/ editor in focus.

Focus Playback Editor and Press F1 Key.
A window with all available shortcuts for your Sequence opens.
Nested Sequence Content
•Create nested sequence content to be dragged onto a main timeline.
•This allows users the creation of sub-compositions and compound sequences.
•The performance of nested content depends on your hardware. In general: Nested sequences need more render resources than regular video content.
How To Create Nested Sequences
There are two different ways to nest sequences into one another:
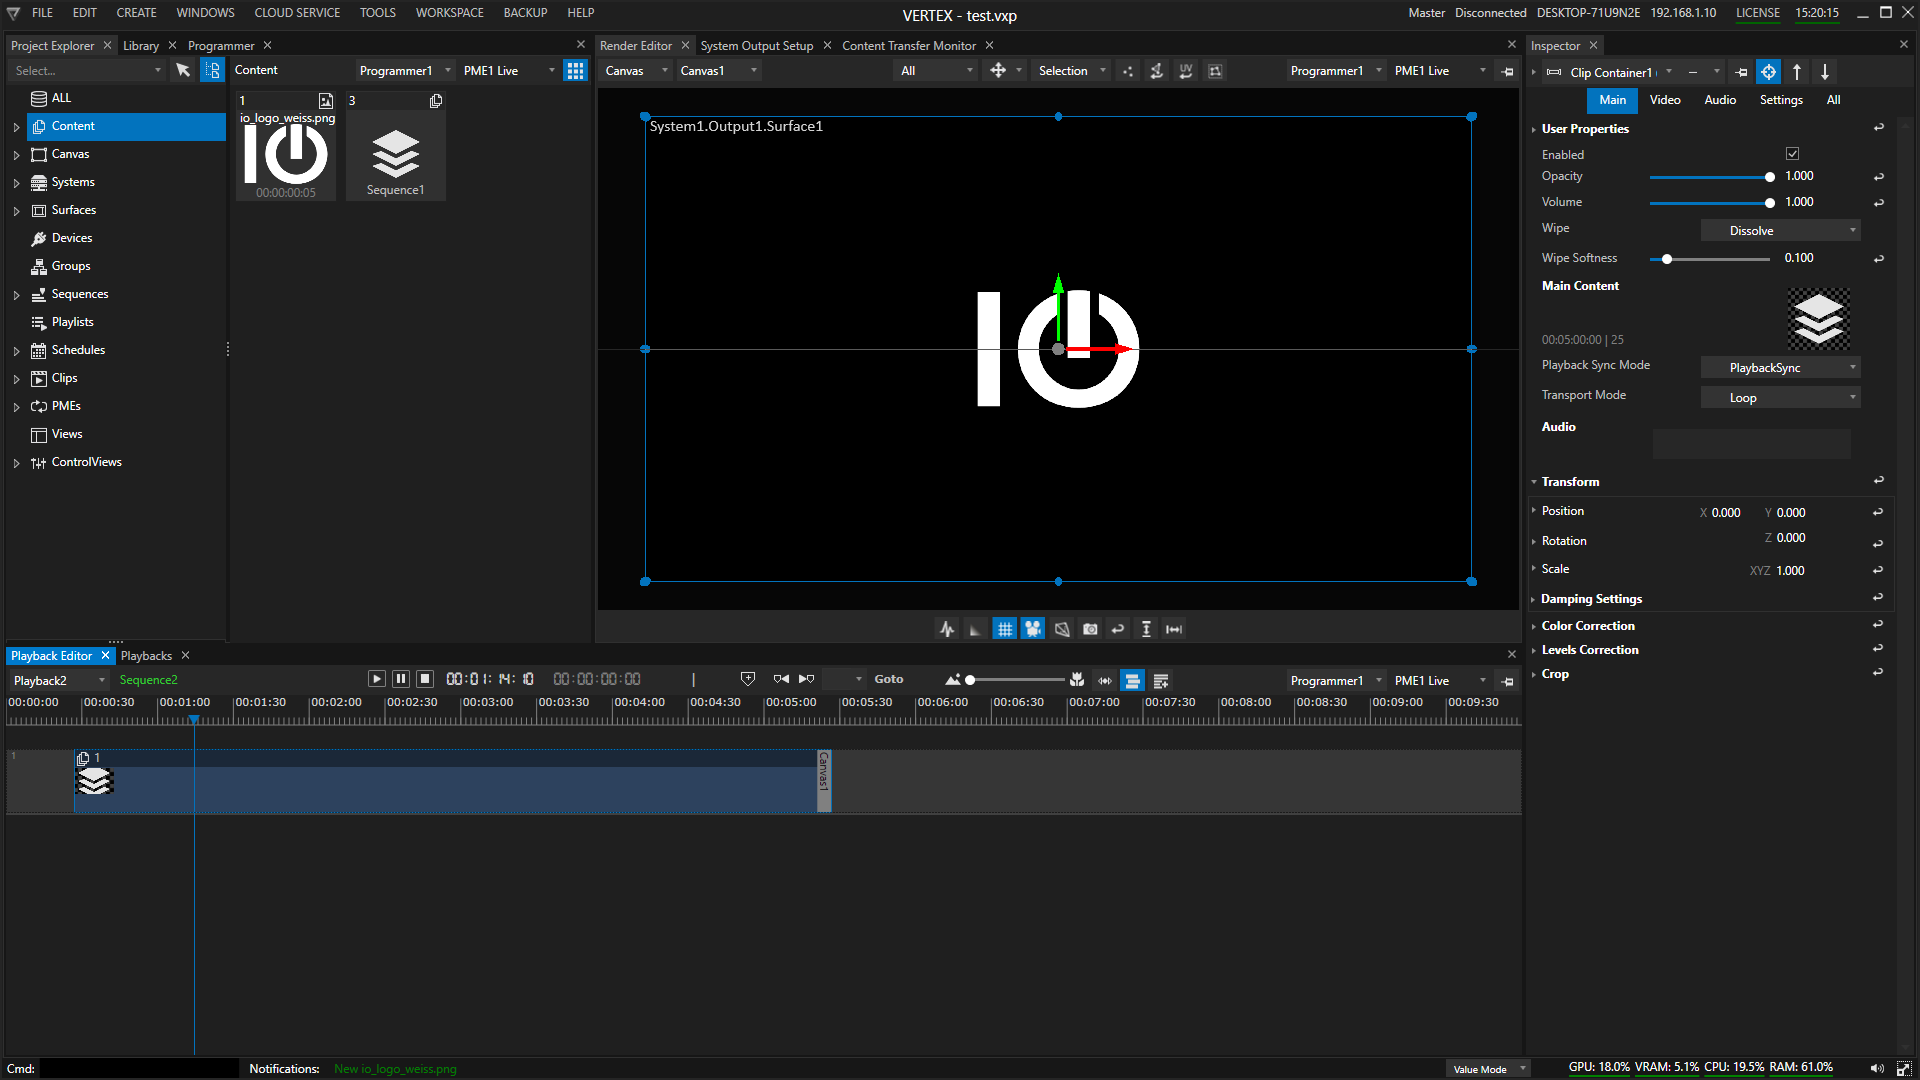
1.Go to Project Explorer, drag a Sequence tile to the Playback Editor and drop it onto a track.
VERTEX creates a Clip Container for this sequence and a Nested Sequence content item in the Project Explorer (it has got an icon with layers).
2.Use the Context menu of a Sequence in the Project Explorer to create Nested Sequence Content
Once created, a Nested Sequence Content item is listed in the content section of your Project Explorer and can be dropped into another Sequence.
 Restrictions for Nesting
Not all Devices are supported for Nested Sequence Content, so be aware of that.
A circular reference is not possible: Nested Sequence Content from a Sequence 1 cannot be used in Sequence 1.
Likewise, nesting content with multiple Canvases is not supported, so be mindful of your Canvas-Surface-Output setup.
We strongly recommend sticking to one Canvas when using Nested Sequence Content.
Performance
VERTEX is a real time software - please keep in mind that using nested sequence content costs you more System performance.
Each nested Sequence has impact on the render pipeline. The performance needs of the render engine increases with deeper nesting, repeated or multiple nesting.
A Nested Sequence operates as an independent Playback Provider instance rather than a controllable Playback.
Therefore, it does not directly drive the playhead in a Playback Editor window.
Nested Playback
•Alternative to Nested Sequence Content with a similar effect, but differently engineered.
•Drag a playback from the Playbacks window or a PME panel in Project Explorer and drop it onto another timeline.
•This creates a Clip Container with the nested playback.
Nested Playbacks offer direct visibility into the referenced playback’s timeline and current playhead position, which can be advantageous for alignment and timing validation while programming or monitoring a show.
However, they do not inherently enforce synchronization or lifecycle control, requiring additional handling to manage activation, deactivation, and transport behavior.
Workflow recommendations
The following settings provide predictable activation, prevent stale frames, and establish a controlled execution boundary for nested playback elements within complex sequence workflows:
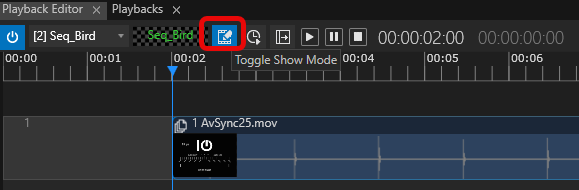
•Locking nested content: enable Show Mode in the Playback Editor of the nested content to prevent unintended playhead manipulation.
•Auto-Activation of the nested playback can be set in the Main tab of the Clip container settings. This will enable auto activation when the playhead runs into the clip. During jump-cues or timeline scrubbing, auto-activation needs to be configured via the Clip Container's Enter Script (e.g., Playback2.Activate) to guarantee correct triggering.
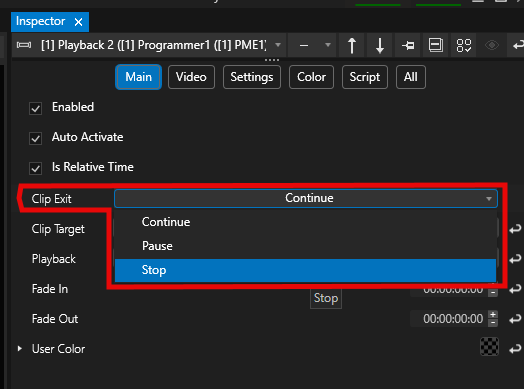
•Deactivation and transport handling are best managed using the Clip Exit property within the clip container (e.g., setting to PAUSE or STOP), ensuring the nested playback does not persist beyond its intended range:
•Is Relative Time (vs host time)
•Enable Is Relative Time to unsynchronize a nested playback from the host playback’s timecode.
When this option is disabled, the nested playback follows the host’s timeline position instead of starting at its own relative time. For example: Sequence 1 is 20 seconds long and the provider for Playback1, which is then nested into Sequence 2 with its Clip Container placed at 00:01:30:00. This will lead to the nested playhead jumping to 1:30 - which is outside its valid range - before looping back to the start.
Disable this setting only when the host and nested playbacks share the same duration.
•For a delayed teardown, implement a Leave Script with a timed offset (e.g., wait 2; Playback2.Deactivate), noting that this requires the Clip Exit behavior to remain set to Continue to avoid preempting the script execution.