•Clip Container can host content, settings, device controller data or even work as a notepad.
•Clip containers are free from layer restrictions and can be moved around freely in the timeline.
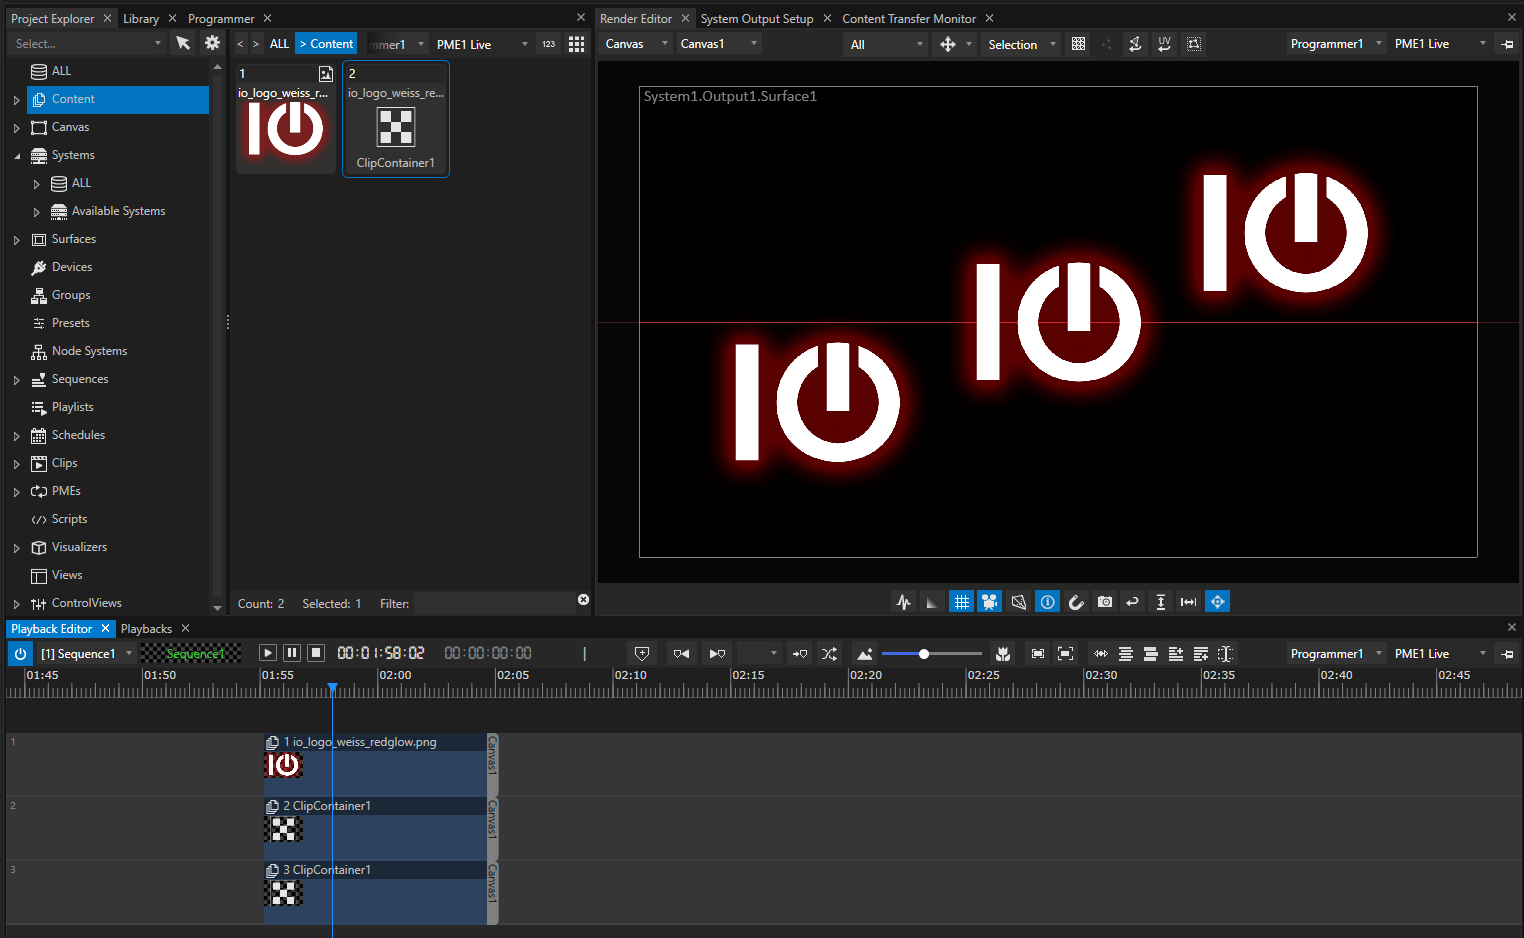
•Clip containers are arranged on tracks in the timeline.
THE VARIOUS KINDS OF CLIP CONTAINER
There are different types of clip containers available - most of the settings are similar for all - some of them have special parameters and properties:
1.Clip containers for content ( most flexible type that you will use frequently for almost everything)
2.And other types of clip containers such as
oclip containers that control devices (i.e. DMX devices)
oclip containers that overwrite global settings for surfaces and outputs
oclip containers for special elements like global-layers or console layers
oclip container just for notes
oSMPTE clips that generate timecode
Some of them (like those for content) you will use more often than others. Some of them are useful for edge cases .
CLIP CONTAINER TARGET
Every clip container has got a target:
•This target is displayed as a flag at the end of each clip container
•For content clips this target is usually a canvas. In special cases, this target could also be an output or even a surface. Or just another canvas.
•Different clip containers in the same sequence can have different targets- there is no restriction. For instance, when working with 3 different canvases, you are able to set them as different targets for your clip containers in the same sequence.
Add or change a target
1.Drag a canvas, a surface or an output with your mouse from the project explorer and drop it into a clip container.
2.Select a clip container with your mouse, go to settings tab in the inspector, drag another target from the project explorer and drop it into this property field.
 Change The Default Canvas Of A Sequence
Select a sequence in the inspector and change the default canvas in the settings tab there.
Every new clip container in this sequence will have this new canvas as target.
CLIP CONTAINERS FOR CONTENT
Content types
A content clip container can host one of the content assets below:
•audio
•image
•an image sequence
•video
•generative/procedural content such as text, solid colors, gradients or test patterns
•shared textures
•nested sequence content
•HTML browser content
Additions
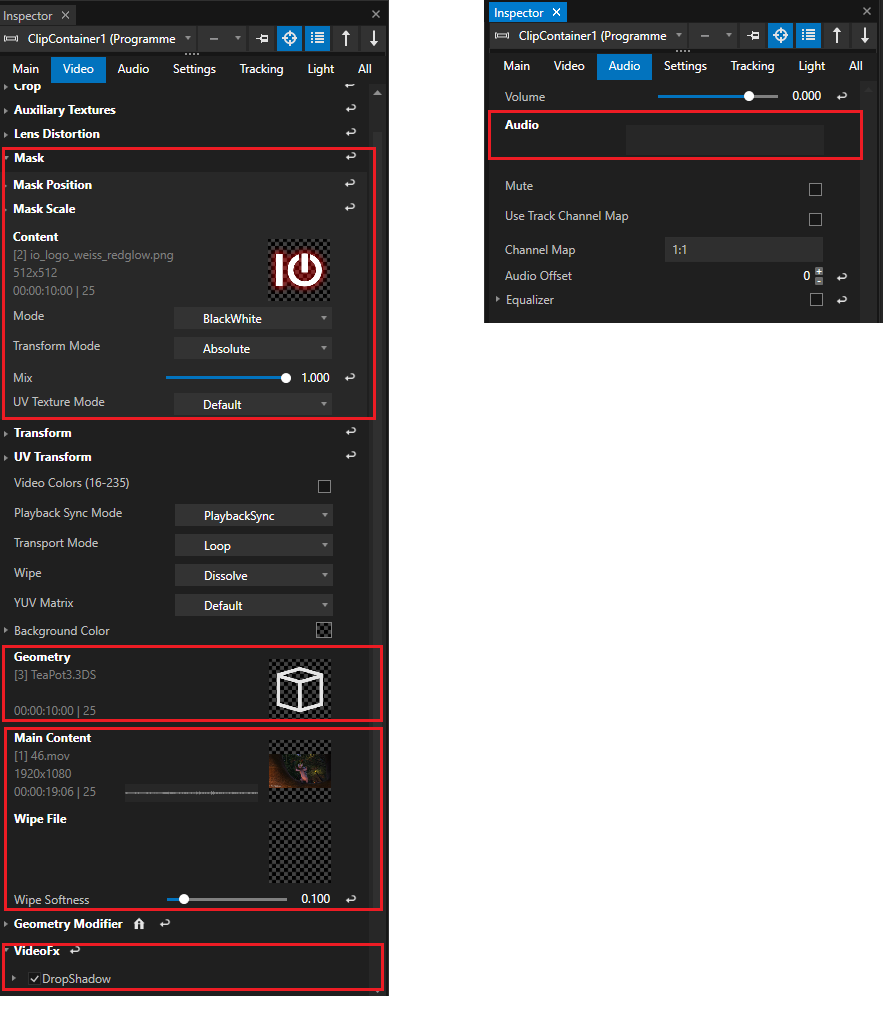
In addition to one of the content types above you are able to assign from the project explorer:
•a mask
•a separated audio track
•a 3D object
or from the project library
•Video Effects (FX)
Workflow and Settings
•Create a clip container: just drag and drop content from the project explorer into the playback editor.
•Replace content by dragging another content file from the project explorer into the clip container
•Scaling can be applied either in the Inspector Transform Properties, in the Plane Settings > Plane Resolution, or via the various options of the context menu Auto fit / Scale to...
•Add video FX : drag and drop your desired effects from the library into the clip container
 FX always requires a base texture in the clip container to work.
This texture can be every type of content - To run an effect like a particle shader use a solid color content as texture for the clip container.
•Add audio to a clip container with video or image content inside: Just drag the audio file from the project explorer into the clip container.
This action also will replace the embedded audio file from a video in the clip container with the new one.
•Add a mask to a clip container with already video or images inside: Hold Shift key and drag the mask image to the clip container.
•Drag a 3D object with your mouse from project explorer to a clip container to add.

3D Objects always require a texture
3D Objects in a Clip Container always require a texture. This texture could be every type of content: an image , a video, an HTML or generative content.
Remove or add a content, a mask, audio, 3D object or FX in the inspector:
In the video or audio tab of the inspector of a clip container you will find all assigned assets
•Drag a mask, 3D object, audio or content to the corresponding fields in inspector to change them.
•Open the context-menu with a right-click to clear or remove an asset
OTHER TYPES OF CLIP CONTAINER
Devices
•Drag a device from the library into your sequence playback editor and VERTEX creates a clip container automatically.
•This is useful for devices that have animatable properties (like e.g. DMX devices have)
•Learn more about devices here
Overwrite Surface and Output Settings
•You are able to create a clip container for each surface and output.
•With this kind of Clip Container you are able to animate surface and output settings
•When this clip container is being played back, it overwrites the global settings of an output or an surface temporarily as long as its duration allows.
There are two ways to create such a clip container:
1.Drag an output or a surface with your mouse from the project explorer into your sequence.
2.Switch to programmer mode. Change the settings of a surface or output in programmer mode. A clip container with keyframes is created when you store your programmer scene.
 Check Clip Container Target
Clip containers for surfaces and outputs always have an output as target - instead of a canvas.
Please double check if the correct output is set as target of your clip container.
Global Layer and Console Layer
•Settings for global layers can be overwritten with clip containers as well.
•Once the playhead runs into the clip container, the settings of a global layer are temporarily overwritten.
There are two ways to do this:
1.Drag a global layer with your mouse from the project explorer into your sequence.
2.Switch to programmer mode. Change settings of a global layer in programmer mode. A clip container with keyframes is created when you store your programmer scene
Notes
•A simple clip container that hosts and shows your notes.
•Create a Clip Container for Notes:
oGo to the playback editor and open the context menu (right-click).
oSelect "Add"
oSelect "Add Notes Clip"
SMPTE Clip
•generates SMPTE timecode when playhead is running into the clip container.
•For further Information read the chapter for SMPTE.
WORKING WITH CLIP CONTAINERS:
COMMON TASKS
•Copy/Paste a clip container and its settings (or keyframes) with shortcuts (CTRL + C / CTRL+V) or with help of the context menu.
•Double-click on a clip container to open the Keyframe Editor
•Move a clip container in the timeline or between tracks by simply dragging it.
•Adjust a Clip Container's length by edge editing: move the mouse over the edges at the beginning and end of a clip container and the arrow will change to the edge editing tool <--> automatically.
•Set a User Color for your clip container.
SELECTION
There are various options to select clip containers in your Sequence Editor:
•Select multiple clips by dragging a lasso around them.
or
•Right-click on a track or an empty space in the Sequence Editor to open the context menu and go to Select... .
From there you can choose to select all clips vertically (at current playhead position), all upcoming/ previous clips and all clips on the current track.
A multi-selection allows property changes of all selected clip containers in the Inspector.
AUTOFADE
•When you drag a Clip Container into another one on the same Track, VERTEX automatically generates an auto-fade for video and audio.
LINK AND UNLINK
•Link or unlink a selection of clip containers as a group.
•You can move linked clip containers "as a package"
•Property changes are taken over for all linked clip containers
CUT CLIP CONTAINER
•Splits a clip container into two parts at playhead position.
•You have 2 options:
CUT ALL CLIP CONTAINERS AT PLAYHEAD POSITION
•Use the cut-button in the Playback Editor
or
•Select a clip container
•Open the context menu with a right-click
•Select "Cut All Clip Containers"
CUT ONLY ONE CLIP CONTAINER AT PLAYHEAD POSITION
•Select a clip container
•Open the context menu with a right-click
•Select "Cut Clip Container"
SETTINGS
There are several properties you can set for a clip container.
Some of them depend on the type of clip container ( surface, content, device), whereas some of them are valid for every type.
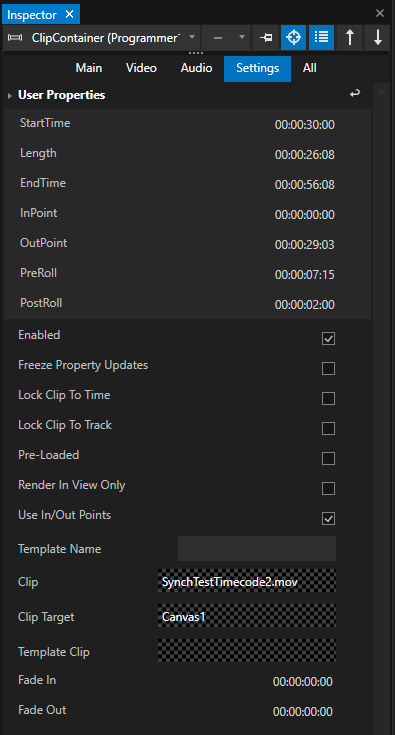
Start Time End Time |
Sets the points in the timeline where a clip container starts or stops. A reset is possible via the context menu. Select a clip container in your playback editor or project explorer and use the command "Reset to Cliplength" |
|
|---|---|---|
Length |
Sets the clip container's length in the timeline. By default the length is set to the duration of the original content audio or video clip. Any other clip containers holding colors, images, textures or data are set to a lenght of 10 seconds by default. The clip container's length is relative to its start and end times. |
|
InPoint OutPoint |
Sets the point of time within the content from which the clip container rolls in and out. For instance, if your clip is just 10 seconds long and the original content exceeds that time, you can select the frame which will be played in the clip. These Settings, however are not relative to the clip's length or start and end times. One of the many ways to create video loops in VERTEX. |
|
PreRoll PostRoll |
Sets a buffer time for loading content before and after the playhead rolls in and out of a clip container. |
|
Enabled |
Enable or disable a clip container to free your system's resources. Content is neither loaded nor rendered if the clip container is disabled (box is set unchecked). |
|
Freeze Property Updates |
Freezing static non animated clip containers will reduce the amount of property updates per rendered frame. In doing so the properties are only updated when the playback enters a clip. |
|
Lock Clip To Time Lock Clip To Track |
To prevent from accidentally moving, lock a clip container to time or to track. Both settings also are available in the context menu of a clip container. When set, a lock icon appears in the clip container. |
|
Pre-Loaded |
This option will permanently load all textures and object data into into system RAM and GPU RAM. Please use only when required as this setting will fill up your system's resources. |
|
Render In View Only |
VERTEX's render engine processes everything on canvas where the playhead points in your timeline. Rendering of clip containers with this setting enabled will be bypassed if the clip is not in view of a surface. A clip container will be rendered when in view only. |
|
Use In/Out Points |
Enables the use of specific in- and out-points. See above. |
|
Template Name |
Name this clip for external references and watch-folder usage |
|
Clip |
Reference to the content of this clip container. |
|
Clip Target |
Sets the canvas where the clip will be displayed. To change it just drag another canvas from the project explorer and drop it into this field or into a clip in the playback editor. |
|
Template Clip |
Names the source of the template clip. |
|
Fade In/Out |
Sets the desired fade length if you choose to fade the clip in or out. |
ICONS ON CLIP CONTAINERS
When certain settings are activated, their respective icons appear on the Clip Container. Here is a quick overview:
Instances
•Instances offer an quick way to duplicate and link clip containers.
•All property settings including keyframe edits are duplicated and linked for all instances of a clip container.
•Clip container instances are marked by default in deep gray color.
Create Instance
•Select a clip container
•Right-click and open the context menu
•Select Create -> Create Clip Container Instance
•A new instance is created by default on a new track at same position.
•Work with the clip container instance and move it around independently.
•Property changes on the original container are taken over to all Instances.
•changes on an instance are taken over also to original clip container.
Shared Textures
Related to the instance function are clip containers with shared textures of content.
Creating a clip container that shares another clip's texture is a resource friendly way to output the same content multiple times simultaneously.
The main difference to creating an instance of a clip is that the clips' property settings are not linked.
Also, the clip with a shared texture will only be played out at the same time the original clip is being rendered.
Create a shared texture by selecting the source clip with the content you want to share and go to Create... in its context menu.
A new clip container with a shared texture will appear in the Project Explorer's Content section and while the source content is only loaded once into the system's memory, it can be used multiple times in the sequence.


