•VERTEX NDI Streamer is a multi source NDI toolkit
•VERTEX NDI Streamer is capable to stream up to 2 desktop regions and 1 live input as a NDI Stream
•The NDI Streamer is free and fully works without a valid VERTEX license
•In addition, all settings and streams can be controlled remotely out of VERTEX (with a license)
This product uses NDI® (SDK v5.0, 2023)
Licensed for free and commercial use under the terms in effect for this version.
Learn more at https://ndi.video/
NDI® is a registered trademark of Vizrt NDI AB.
Start NDI Streamer
•The VERTEX NDI Streamer comes up in a package with the VERTEX installer
•Just download and install an up-to-date Version of VERTEX
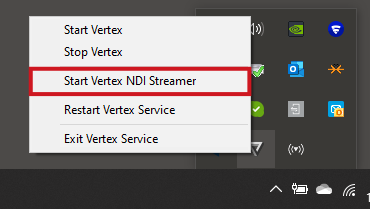
•Right-click with your Mouse on the VERTEX Tray Icon on the Windows taskbar
•Start Vertex NDI Streamer
•When the NDI Streamer is started, a new Icon appears into the windows tray bar
Set up NDI Streams
•Right-Click on the VERTEX NDI Streamer tray icon in the windows taskbar
•Select "Show Settings"
•Now you can enable up to 3 NDI Streams from your PC
Stream 1 + 2
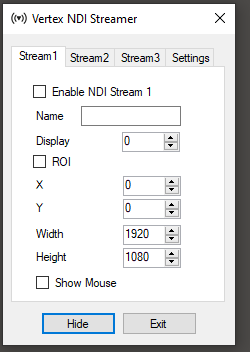
enable you to set up two NDI streams that capture a display (or only a region) of your PC.
Name
Name of the stream that is shown for all NDI applications
Display
Select the display number of your PC that should be sent as NDI stream.
ROI
Region of Interest. Default: disabled
Enable to capture only a region of the selected display as NDI stream
Enter pixel coordinates (starting at top left) and width/height to define the ROI
Show Mouse
Show mouse pointer in NDI stream
Stream 3
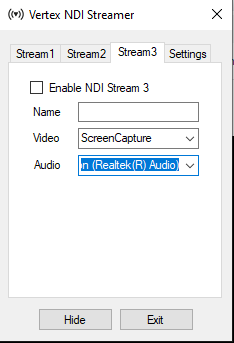
Stream 3 differs from the first ones. Here, you are able to send a video source (e.g. a webcam) and audio source (like a a microphone)
from your Windows PC as NDI stream.
Name
Name of the stream that is shown for all NDI applications
Video
Select from a list of video sources.
Depending on your PC hardware and configuration the list of available sources may vary
Audio
Select from a list of audio sources.
Depending on your PC hardware and configuration the list of available sources may vary
Settings
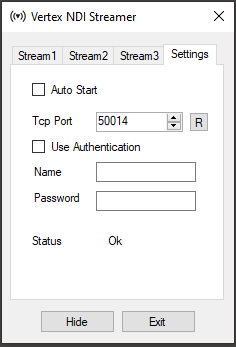
Auto Start
Enable to add the NDI Streamer to Microsoft Windows autostart
TCP Port
Change port number for remote controlling the NDI streamer over TCP.
Use the R-Button to restart the TCP Servers after a port change.
R Button
Reset and Restart the TCP Server for all network adapters after you have changed the TCP Port
Use Authentication
Set User Name and Password for TCP Authentication
Remote Control out of VERTEX
•You can remote control all settings of the VERTEX NDI Streamer on a PC in your network out of VERTEX
•Just add a "Vertex NDI Streamer" Device from the Library into your current project
•Once configured, you have access to all settings of the NDI Streamer application and are able to automate your NDI workflow
Setup
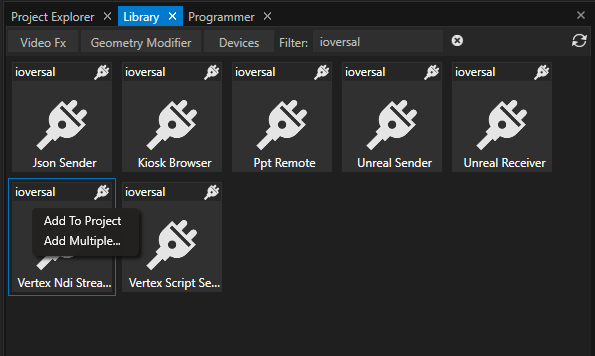
•Open the Library
•Select Devices and filter for "ioversal"
•Right-click to the device "Vertex NDI Streamer"
•"Add to project"
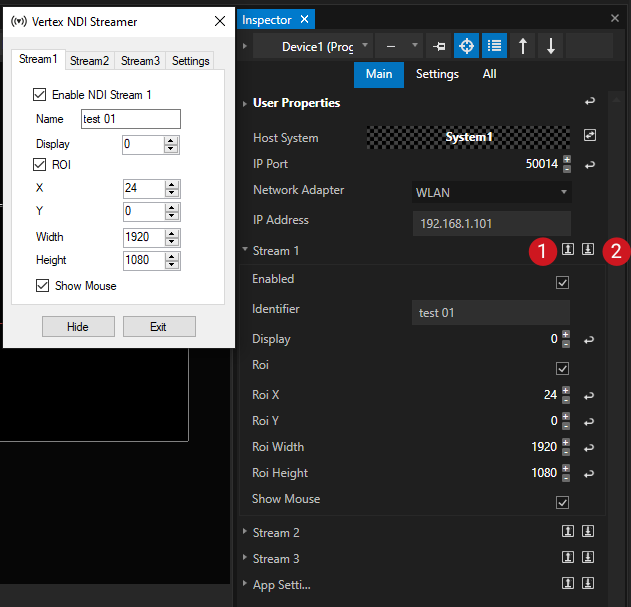
•Select the device in the Project Explorer and set the initial properties in the Inspector
•Once the connection is set up, you are able to upload and download all application and stream settings.
IP Port
Enter here the same IP Port as set in the NDI Streamer application
Network Adapter
Choose a network adapter from your local VERTEX instance
IP Address
Enter IP address of the PC on that the Vertex NDI Streamer application is running and should be remote controlled
Upload Settings
Upload all current settings from VERTEX to the NDI Streamer application
Download Settings
Download all current settings from NDI Streamer application to Inspector
Scripting
As with every Device in VERTEX, you can control an NDI Streamer Device with a Script.
For the following examples the NDI-Streamer Device was added as "Device1" to a project
Enable and disable Stream 1 on the remote PC
Device1.Settings.Stream1.Enabled.Value = true
Device1.Settings.Stream1.Enabled.Value = false
Show Mouse Cursor in NDI Stream 1
Device1.Settings.Stream1.ShowMouse.Value = true
