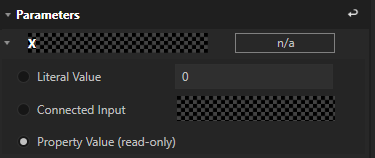
•Most Nodes have Parameters where the data source is defined: This could be a Connected Input, A Literal value or a Property Value
•Some Nodes are working with one or multiple conditions that could be true or false
•There are different options to validate conditions
Parameters
Most of the Nodes are working with Parameter(s) for data. Depending on the type of the Node, there are different options.
A Parameter could be:
•A Connected Input that is connected to an output of another Node and receives data
•A Literal Value: a fix value that is manually added by you
•A Property Value: a Property Value of an item. This could e.g. be an Input Value of a Device, a Dimension x-coordinate of a Canvas, an Opacity of a Surface, a Position of a Clip Container,...
For every item into VERTEX, properties are listed into the Inspector. Most of them (not all) could be used as Parameter Inputs of a Node.
Add a Parameter
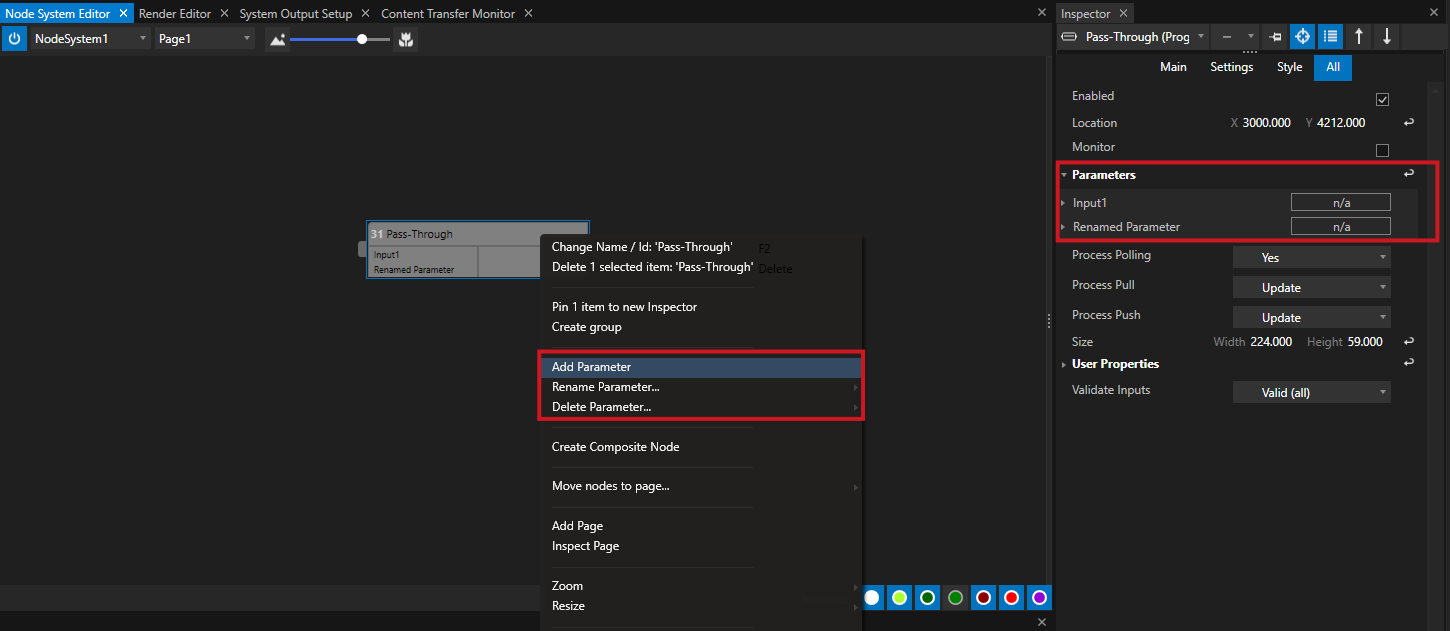
In most cases during your work with Nodes, Nodes already have parameters after they have been created. Furthermore, there is an option to manually add another Parameter.
•Right-Click on a Node
•The Context Menu opens
•Select "Add Parameter"
•For some types of Nodes, you can select between "Text", "Float", "Integer" and "Boolean"
•A new Parameter is added to the selected Node
 A New parameter is not displayed in a Node or not shown in the Inspector?
Please enlarge the node downwards by dragging the lower edge of the node with the mouse. The new parameter should now be visible.
If the new Parameter is not displayed into the Inspector, please refresh the Inspector by selecting the same Node again.
Rename a Parameter
•For some Nodes (e.g. the Pass-Through Node) it is possible to rename a Parameter.
•Click on the Node, open the Context Menu and select "Rename"
Delete a Parameter
•Right-Click on a Node
•The Context Menu opens
•Select "Delete Parameter"
Show full Parameter source
 Show full property source of a Node Parameter
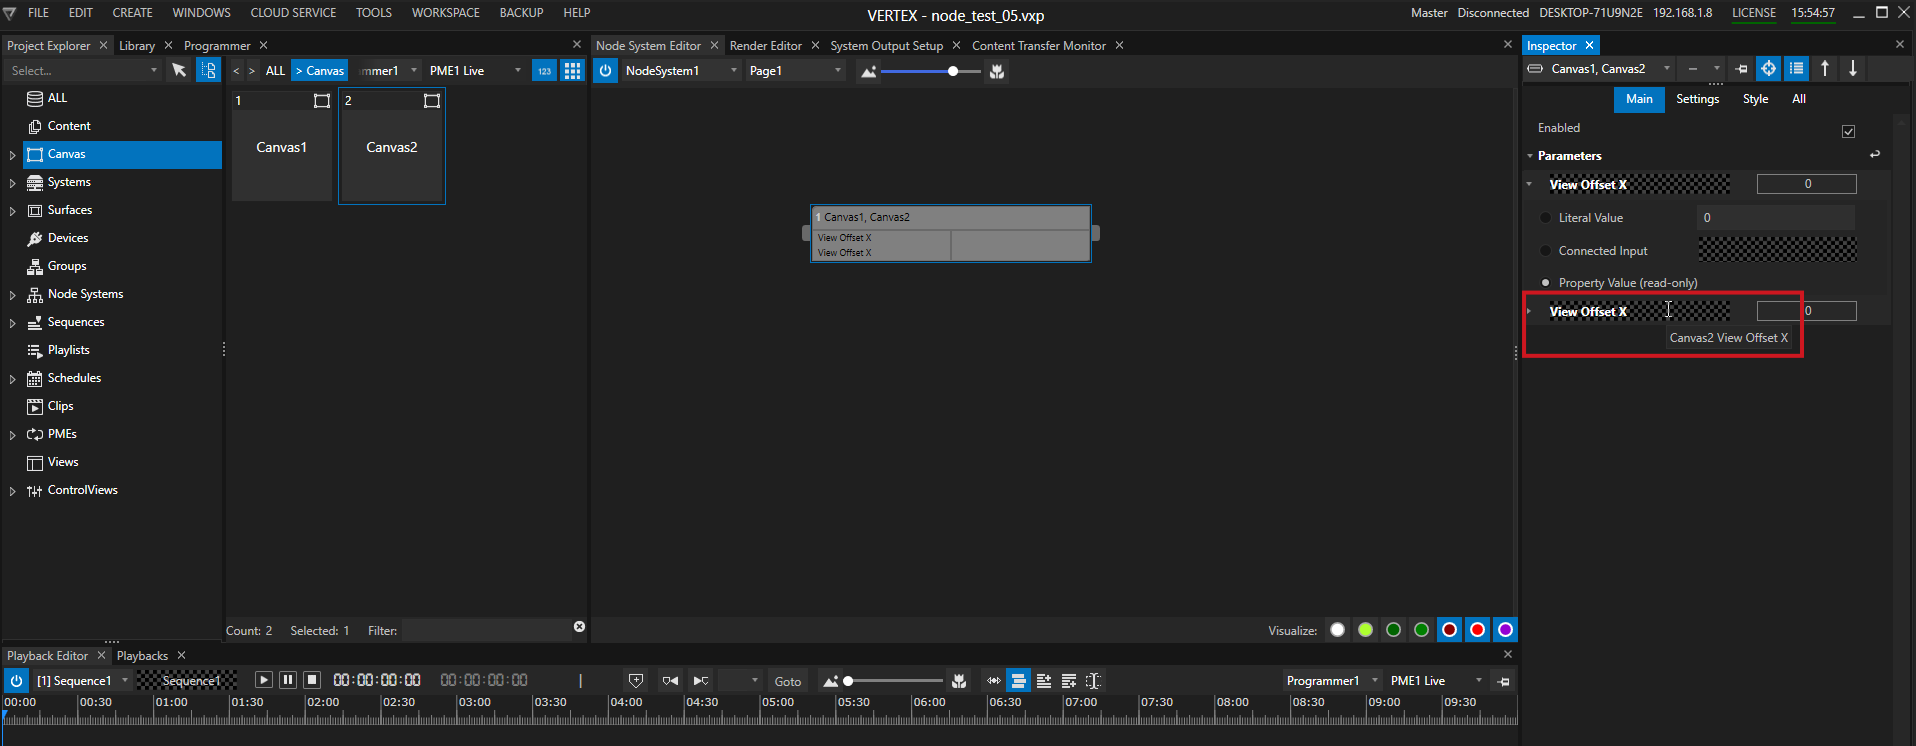
For a better and cleaner overview - the property fields of a Node in the Inspector show reduced information: They only shows the property name but not the full origin. When working with combined Nodes, a tooltip displays you the whole property source.
To show this tooltip, hover with your mouse over the parameter field into Inspector or over the parameter field of the Node into Node Systems Editor.
Advanced: Input Mode for Property Parameters
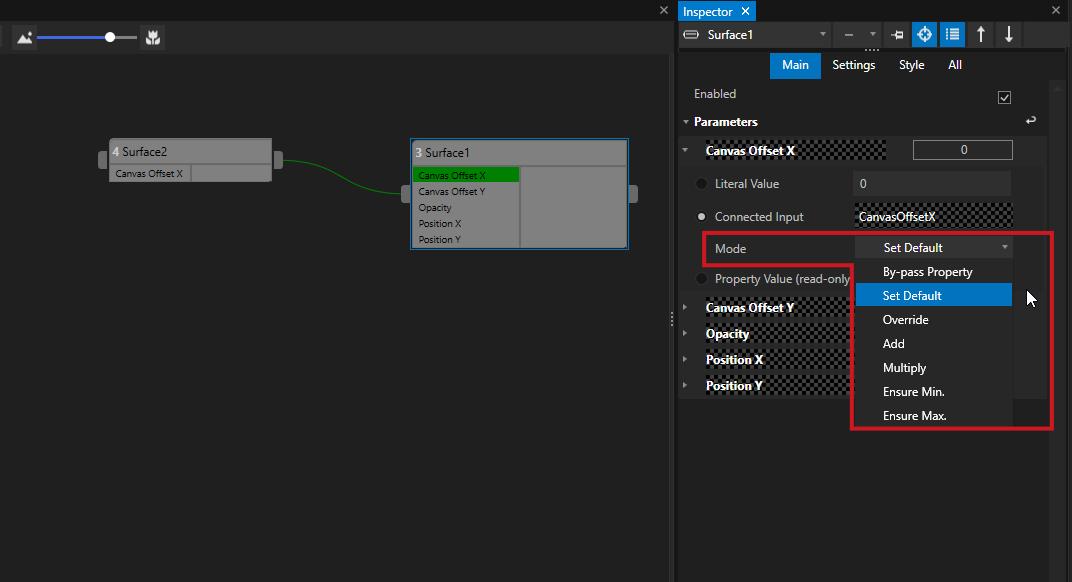
•There are special and advanced settings for Parameters that have a Property from a Project Item (e.g. a Clip Container, a System, a Surface) as source
•You are able to define a mode how the property modulation from a node will relate to data for this property that is used and modified on other places into VERTEX
 Data Modulation for Properties and the processing chain in VERTEX
In VERTEX there are many different ways for you to model the data of a property (e.g. the opacity of a surface). Manually with the Fader in the Inspector, but also with e.g. Wiring, Triggering or with values, which are written into the Programmer.
In VERTEX internally all these influences are processed on a value. Because it is software and complex math this must happen after a certain order. Node Systems are the last part of such an internal processing chain under the hood of VERTEX.
The result of a node system - a so-called Modulator - is considered and added last, before a property value is finally rendered or output.
Bypass:
The property will not be affected. Consuming Nodes will use the input's value, regardless of the property's value.
Set Default:
The default value of the property will be changed according to the Node's Input value.
Override:
The modulator for the property will override the previously evaluated value with the input value of this Node
Add:
The modulator for the property will add the input value of this Node to the previously evaluated value
Multiply:
The modulator for the property will multiply the input's value with the previously evaluated value.
EnsureMax:
The modulator for the property will ensure that the resulting value is not greater than the input's value.
EnsureMin:
The modulator for the property will ensure that the resulting value is not lesser than the input's value.
Conditions
•A condition can be true or false
•When the selected validation applies, a Script is triggered
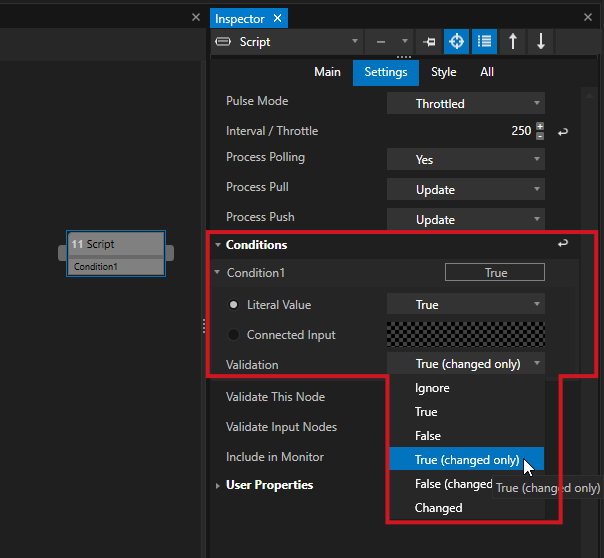
•You can choose from a list of validation options - the default validation is true ( if the input is "true", a Script is triggered)
 Accepted Input Values
Nodes with a Condition expect only values at the input that are either true or false or the equivalent numbers 1 and 0.
Other numbers and other values are therefore not accepted.
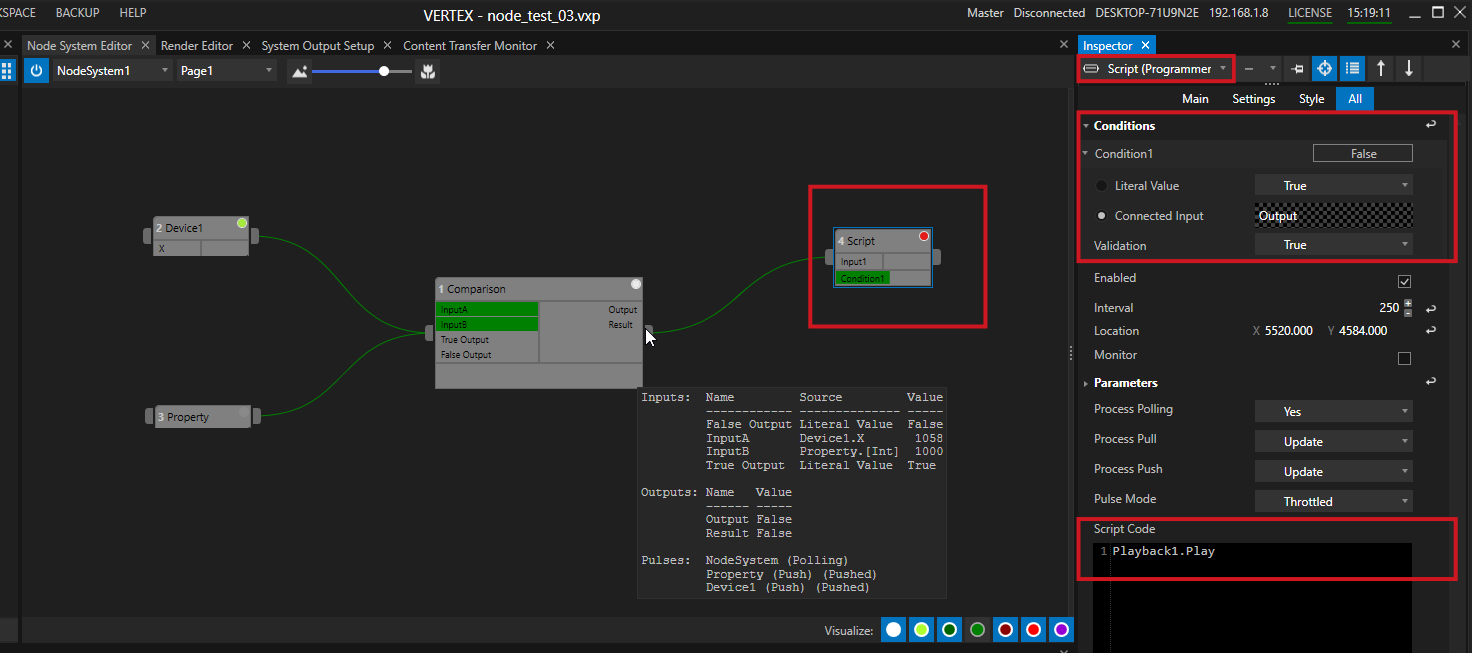
Example for a Condition:
A "Compare" Nodes compares two incoming Values. If Input 1 is bigger than Input 2 it returns a "False".
This logical result is connected to a Script Node that expects a "True" or a"False" as Condition.
Because "False" is the incoming data, the Script Code is not executed. The "Viszualize Pulse" Monitor shows a red dot.
How to do
•Create a Node that works with a Condition (e.g. a Script Node)
•Or add a condition to an already existing Node (use the context menu with a right click)
•Connect the Node with a valid data connection - the incoming data from another Node has to be a Boolean "True" or "False"
•Select the Node into Inspector
•Fold out the "Conditions" Section there - check the options for validation
•Go to Inspectors Main Tab
•Enter some Script Code that should be executed when the validation is reached
 Change to Advanced-Mode to see added Conditions for some Nodes
Basically you are allowed to add conditions to almost all type of Nodes - also those that a first created with only Parameters.
If "Add Conditions" is offered into the Context Menu of a Node (right-click with your Mouse on a Node), it is possible to add a Condition to this Node. Depending on the Node type it it could be that you have to change the Inspector Mode to Advanced to see the Condition for your node in the inspector besides the Parameters
Validation
You are able to change the validation type of a Condition.
Just expand the menu from a Condition into the Inspector.
There is a dropdown where you can set one of the following validation options:
Ignore:
Ignore incoming Data
True:
Execute Script if Incoming data has the Boolean value "True"
False:
Execute Script if Incoming data has the Boolean value "False"
True (Changed only):
Execute Script if Incoming data has the Boolean value "True" and has changed from "False"
False (Changed only):
Execute Script if Incoming data has the Boolean value "False" and has changed from "True"
Changed:
Execute Script is incoming Boolean has changed its value
Validate This Node
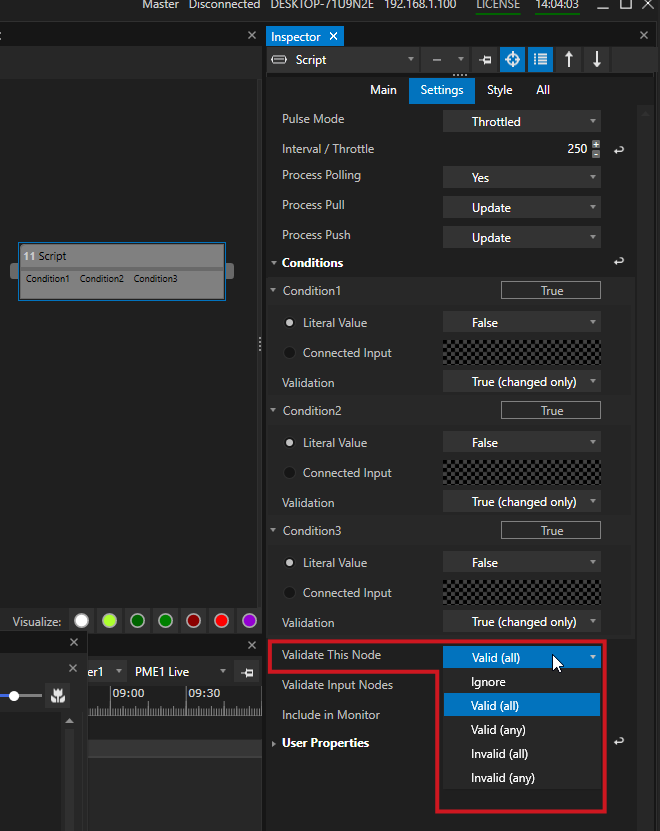
•If working with multiple Conditions in the same Node, "Validate this Node" gives you the option to make the Node behavior dependent on several incoming conditions
Ignore:
Ignore the validation of all conditions
Valid (all):
Node is only executed if all of the conditions are valid
Valid (any):
Node is only executed if in minimum one of the conditions is valid
Invalid (all):
Node is only executed if all of the conditions are invalid
Invalid (any):
Node is only executed if in minimum one of the conditions is invalid
Advanced: Validate Input Nodes
•To control whether nodes are processed in order to conserve performance, nodes can be "validated", i.e. they are only executed if certain conditions are met.
•These can be own conditions (Validate this Node) or conditions of nodes connected as input, which they "inherit".
•"Validate Input Nodes" ensures that all Nodes or a chain of Nodes that are connected to this Node are valid or even not.
•If the validation fails, the Node will not be processed
