•Controlling Vertex from a DMX console with Console Layers allows users to control video as if it were a lighting fixture
•A Console Layer is independent from a Sequence or a Playlist. It is only assigned to a Canvas.
•192 DMX channels per Console Layer offer a wide range of control for video playback and fine tuning VFX such as iris or shaper.
•Use Console Layers as ClipContainers to temporarily overwrite global values during your show.
Channel Map
•Each Console Layer has 192 DMX-Channels
•The following channel maps may be used as a reference for a lighting console library fixture.
DMX Channel Map for a Console Layer
DMX Addresss |
Category |
Parameter Name |
Type |
Default Value |
Notes |
|
|---|---|---|---|---|---|---|
1 |
Mix Level |
opacity coarse |
1 |
16bit |
0 |
16bit opacity 1 mode for crossfade wipe modetexture |
2 |
|
opacity fine |
1 |
|
|
|
3 |
|
opacity wipe mode |
1 |
|
0 |
0-255 where 0 no wipe/ cross-fade |
4 |
|
opacity wipe softness |
2 |
16bit |
0 |
|
5 |
|
fine |
|
|
|
|
6 |
|
volume coarse |
2 |
16bit |
0 |
|
7 |
|
volume fine |
|
|
|
|
8 |
Position |
xpos coarse |
2 |
16bit |
32768 |
32768 = 0 65535 = + 16.000 pixel 0 = -16.000 pixel |
9 |
|
xpos fine |
|
|
|
|
10 |
|
ypos coarse |
2 |
16bit |
32768 |
32768 = 0 65535 = + 16.000 pixel 0 = -16.000 pixel |
11 |
|
ypos fine |
|
|
|
|
12 |
|
zpos coarse |
2 |
16bit |
32768 |
32768 = 0 65535 = + 16.000 pixel 0 = -16.000 pixel |
13 |
|
zpos fine |
|
|
|
|
14 |
Rotation |
xrot coarse |
2 |
16bit |
32768 |
mode crossfade from absolute to continuous value |
15 |
|
xrot fine |
|
|
|
128 = no motion 255=fastForward 0= fastReverse |
16 |
|
xrot XFade |
2 |
16bit |
|
2 abs rotation 1 mode 1 rotation speed |
17 |
|
fine |
|
|
|
|
18 |
|
xrot speed |
2 |
16bit |
|
|
19 |
|
fine |
|
|
|
|
20 |
|
yrot coarse |
2 |
16bit |
32768 |
|
21 |
|
yrot fine |
|
|
|
|
22 |
|
yrot XFade |
2 |
16bit |
|
mode crossfade from absolute to continuous value |
23 |
|
fine |
|
|
|
128 = no motion 255=fastForward 0= fastReverse |
24 |
|
yrot speed |
2 |
16bit |
|
2 abs rotation 1 mode 1 rotation speed |
25 |
|
fine |
|
|
|
|
26 |
|
zrot coarse |
2 |
16bit |
32768 |
|
27 |
|
zrot fine |
|
|
|
|
28 |
|
zrot Xfade |
2 |
16bit |
|
|
29 |
|
fine |
|
|
|
|
30 |
|
zrot speed |
2 |
16bit |
|
|
31 |
|
fine |
|
|
|
|
32 |
Scale |
xscale |
2 |
16bit |
32768 |
|
33 |
|
xscale fine |
|
|
|
|
34 |
|
yscale |
2 |
16bit |
32768 |
|
35 |
|
yscale fine |
|
|
|
|
36 |
|
zscale |
2 |
16bit |
32768 |
|
37 |
|
zscalefine |
|
|
|
|
38 |
|
OutputFit |
1 |
|
|
0= 1to1 Pixel 10-19 Fill, 20-29 Fit, 30-39 Horizontal Fit, 40-49 Vertical Fit |
39 |
Playback |
PlayModes |
1 |
|
|
0-7 Pause In Frame |
|
|
|
|
|
|
8-15 PlayOnce Continue On Dimmer Zero |
|
|
|
|
|
|
16-31 PlayLoop Continue On Dimmer Zero |
|
|
|
|
|
|
32-47 PingPong Continue On Dimmer Zero |
|
|
|
|
|
|
48-63 PlayOnce Pause On Dimmer Zero |
|
|
|
|
|
|
64-79 PlayLoop Pause On Dimmer Zero |
|
|
|
|
|
|
80-95 PingPong Pause On Dimmer Zero |
|
|
|
|
|
|
122-134 Pause On Current Frame |
|
|
|
|
|
|
136-140 PlayOnce Seek To Inpoint on Dimmer Zero |
|
|
|
|
|
|
142-148 PlayLoop Seek To Inpoint on Dimmer Zero |
|
|
|
|
|
|
150-156 PingPong Seek To Inpoint on Dimmer Zero |
|
|
|
|
|
|
157-164 PlayReverseOnce Continue on Dimmer Zero |
|
|
|
|
|
|
166-173 PlayReverseLoop Continue on Dimmer Zero |
|
|
|
|
|
|
175-182 PlayReverseOnce Seek To Outpoint on Dimmer Zero |
|
|
|
|
|
|
184-191 PlayReverseLoop Seek To Outpoint on Dimmer Zero |
|
|
|
|
|
|
240 Play Once Reset SeekToInpoint on Dimmer Zero |
|
|
|
|
|
|
241 Play Once Reset Reverse SeekToInpoint on Dimmer Zero |
|
|
|
|
|
|
242 Play Once Reset Continue on Dimmer Zero |
|
|
|
|
|
|
243 Play Once Reset Reverse Continue on Dimmer Zero |
|
|
|
|
|
|
244 Play Reverse Once Reset SeekToInpoint on Dimmer Zero |
|
|
|
|
|
|
245 Play Reverse Once Reset Forward SeekToInpoint on Dimmer Zero |
|
|
|
|
|
|
246 Play Reverse Once Reset Continue on Dimmer Zero |
|
|
|
|
|
|
247 Play Reverse Once Reset Forward Continue on Dimmer Zero |
|
|
|
|
|
|
248-255 Pause On OutFrame |
40 |
|
Playback Speed |
2 |
16bit |
49152 |
0-32768 slowest / pause 32769-49152 slow to normal factor 0-1.0 49152 normal play factor 1 49153 to 65534 normal to fast fwd 1x-8x |
41 |
|
fine |
|
|
|
|
42 |
|
In Frame |
2 |
16bit |
0 |
65535 frames from first frame in |
43 |
|
fine |
|
|
|
|
44 |
|
Out Frame |
2 |
16bit |
0 |
65535 frames from last frame in |
45 |
|
fine |
|
|
|
|
46 |
|
Gobo MixMode |
1 |
|
0 |
Mode to determine if gobo2 is mask or how it is multiplied over gobo1, 0 BlackWhite, 1 BwInv,2 Alpha,3 AlphaInv,4 Overlay |
47 |
|
Gobo MixLevel |
2 |
16bit |
0 |
Mix Level for Gobo Blend Mode |
48 |
|
fine |
|
|
|
|
49 |
Gobo1 |
Content Folder |
1 |
|
0 |
|
50 |
|
Content File |
1 |
|
0 |
|
51 |
|
Content UV Mode |
1 |
|
|
Texture Wrap Mode: Default, Tile, No Tile, Mirror |
52 |
|
Content UV Xoffset |
2 |
16bit |
32768 |
Left to right |
53 |
|
fine |
|
|
|
|
54 |
|
Content UV Yoffset |
2 |
16bit |
32768 |
bottom to top |
55 |
|
fine |
|
|
|
|
56 |
|
Content UV X Scale |
2 |
16bit |
32768 |
32768 =0 0 = maxTiling 65535 maxScaling |
57 |
|
fine |
|
|
|
|
58 |
|
Content UV Y Scale |
2 |
16bit |
32768 |
32768 =0 0 = maxTiling 65535 maxScaling |
59 |
|
fine |
|
|
|
|
60 |
Gobo2 |
Mask Folder |
1 |
|
0 |
|
61 |
|
Mask File |
1 |
|
0 |
|
62 |
|
Mask Transform Mode |
1 |
|
|
Relative or Absolute Mode - Link Sizing and position to Content |
63 |
|
Mask UV Mode |
1 |
|
|
Texture Wrap Mode:Default,Tile, No Tile, Mirror |
64 |
|
Mask UV Xoffset |
2 |
16bit |
32768 |
Left to right |
65 |
|
fine |
|
|
|
|
66 |
|
Mask UV Yoffset |
2 |
16bit |
32768 |
bottom to top |
67 |
|
fine |
|
|
|
|
68 |
|
Mask UV X Scale |
2 |
16bit |
32768 |
32768 =0 0 = maxTiling 65535 maxScaling |
69 |
|
fine |
|
|
|
|
70 |
|
Mask UV Y Scale |
2 |
16bit |
32768 |
32768 =0 0 = maxTiling 65535 maxScaling |
71 |
|
fine |
|
|
|
|
72 |
|
Geometry Folder |
1 |
|
|
|
73 |
|
Geometry File |
1 |
|
|
|
74 |
|
res |
1 |
|
|
reserved for Geometry playmode |
75 |
|
res |
2 |
16bit |
|
reserved for Geometry playspeed |
76 |
|
res fine |
|
|
|
|
77 |
|
res |
2 |
16bit |
|
reserved for Geometry InFrame |
78 |
|
res fine |
|
|
|
|
79 |
|
res |
2 |
16bit |
|
reserved for Geometry OutFrame |
80 |
|
res fine |
|
|
|
|
81 |
Iris |
Iris Mode |
1 |
|
255 |
Black Black Inv, Alpha, Alpha Inv, White, White inv |
82 |
|
Iris Size |
2 |
16bit |
65535 |
Default 65535 |
83 |
|
fine |
|
|
|
|
84 |
|
Iris Softness |
2 |
16bit |
3300 |
Default 3300 |
85 |
|
fine |
|
|
|
|
86 |
|
Iris X |
2 |
16bit |
32768 |
Default 32768 |
87 |
|
fine |
|
|
|
|
88 |
|
Iris Y |
2 |
16bit |
32768 |
Default 32768 |
89 |
|
fine |
|
|
|
|
90 |
Shaper |
Shaper Mode |
1 |
|
255 |
Black Black Inv, Alpha, Alpha Inv, White, White inv |
91 |
|
Shaper Softness |
2 |
16bit |
2000 |
Default 2000 |
92 |
|
fine |
|
|
|
|
93 |
|
SL |
2 |
16bit |
|
|
94 |
|
fine |
|
|
|
|
95 |
|
SL Rot |
2 |
16bit |
32768 |
Default 32768 |
96 |
|
fine |
|
|
|
|
97 |
|
SR |
2 |
16bit |
|
|
98 |
|
fine |
|
|
|
|
99 |
|
SR Rot |
2 |
16bit |
32768 |
Default 32768 |
100 |
|
fine |
|
|
|
|
101 |
|
ST |
2 |
16bit |
|
|
102 |
|
fine |
|
|
|
|
103 |
|
ST Rot |
2 |
16bit |
32768 |
Default 32768 |
104 |
|
fine |
|
|
|
|
105 |
|
SB |
2 |
16bit |
|
|
106 |
|
fine |
|
|
|
|
107 |
|
SB Rot |
2 |
16bit |
32768 |
Default 32768 |
108 |
|
fine |
|
|
|
|
109 |
Color Mix |
Color Mix Mode |
1 |
|
|
Normal, Add, Multiply, InverseMultiply, Highlights |
110 |
|
Color Mix Level |
2 |
16bit |
|
|
111 |
|
fine |
|
|
|
|
112 |
|
Red |
2 |
16bit |
|
|
113 |
|
fine |
|
|
|
|
114 |
|
Green |
2 |
16bit |
|
|
115 |
|
fine |
|
|
|
|
116 |
|
Blue |
2 |
16bit |
|
|
117 |
|
fine |
|
|
|
|
118 |
|
Alpha |
2 |
16bit |
|
|
119 |
|
fine |
|
|
|
|
120 |
Color Correction |
Hue |
2 |
16bit |
32768 |
|
121 |
|
fine |
|
|
|
|
122 |
|
Saturation |
2 |
16bit |
32768 |
|
123 |
|
fine |
|
|
|
|
124 |
|
Contrast |
2 |
16bit |
32768 |
|
125 |
|
fine |
|
|
|
|
126 |
|
Brightness |
2 |
16bit |
32768 |
|
127 |
|
fine |
|
|
|
|
128 |
|
Red Balance |
2 |
16bit |
32768 |
|
129 |
|
fine |
|
|
|
|
130 |
|
Green Balance |
2 |
16bit |
32768 |
|
131 |
|
fine |
|
|
|
|
132 |
|
Blue Blanace |
2 |
16bit |
32768 |
|
133 |
|
fine |
|
|
|
|
134 |
|
Levels Min |
2 |
16bit |
0 |
|
135 |
|
fine |
|
|
|
|
136 |
|
Levels Value |
2 |
16bit |
32768 |
|
137 |
|
fine |
|
|
|
|
138 |
|
Levels Max |
2 |
16bit |
65535 |
|
139 |
|
fine |
|
|
|
|
140 |
|
BlendMode |
1 |
|
|
reserved |
141 |
FX1 |
FX1 Select |
1 |
|
|
|
142 |
|
FX1 Mix |
2 |
16bit |
|
|
143 |
|
fine |
|
|
|
|
144 |
|
FX1 C1 |
2 |
16bit |
|
|
145 |
|
fine |
|
|
|
|
146 |
|
FX1 C2 |
2 |
16bit |
|
|
147 |
|
fine |
|
|
|
|
148 |
|
FX1 C3 |
2 |
16bit |
|
|
149 |
|
fine |
|
|
|
|
150 |
|
FX1 C4 |
2 |
16bit |
|
|
151 |
|
fine |
|
|
|
|
152 |
|
FX1 C5 |
2 |
16bit |
|
|
153 |
|
fine |
|
|
|
|
154 |
FX2 |
FX2 Select |
1 |
|
|
|
155 |
|
FX2 Mix |
2 |
16bit |
|
|
156 |
|
fine |
|
|
|
|
157 |
|
FX2 C1 |
2 |
16bit |
|
|
158 |
|
fine |
|
|
|
|
159 |
|
FX2 C2 |
2 |
16bit |
|
|
160 |
|
fine |
|
|
|
|
161 |
|
FX2 C3 |
2 |
16bit |
|
|
162 |
|
fine |
|
|
|
|
163 |
|
FX2 C4 |
2 |
16bit |
|
|
164 |
|
fine |
|
|
|
|
165 |
|
FX2 C5 |
2 |
16bit |
|
|
166 |
|
fine |
|
|
|
|
167 |
FX3 |
FX3 Select |
1 |
|
|
|
168 |
|
FX3 Mix |
|
|
|
|
169 |
|
fine |
2 |
16bit |
|
|
170 |
|
FX3 C1 |
2 |
16bit |
|
|
171 |
|
fine |
|
|
|
|
172 |
|
FX3 C2 |
2 |
16bit |
|
|
173 |
|
fine |
|
|
|
|
174 |
|
FX3 C3 |
2 |
16bit |
|
|
175 |
|
fine |
|
|
|
|
176 |
|
FX3 C4 |
2 |
16bit |
|
|
177 |
|
fine |
|
|
|
|
178 |
|
FX3 C5 |
2 |
16bit |
|
|
179 |
|
fine |
|
|
|
|
180 |
FX4 |
FX4 Select |
1 |
|
|
|
181 |
|
FX4 Mix |
2 |
16bit |
|
|
182 |
|
fine |
|
|
|
|
183 |
|
FX4 C1 |
2 |
16bit |
|
|
184 |
|
fine |
|
|
|
|
185 |
|
FX4 C2 |
2 |
16bit |
|
|
186 |
|
fine |
|
|
|
|
187 |
|
FX4 C3 |
2 |
16bit |
|
|
188 |
|
fine |
|
|
|
|
189 |
|
FX4 C4 |
2 |
16bit |
|
|
190 |
|
fine |
|
|
|
|
191 |
|
FX4 C5 |
2 |
16bit |
|
|
192 |
|
fine |
|
|
|
|
 ChamSys
ChamSys consoles enforce a maximum DMX channel count per library fixture. Consequently, a VERTEX Console Layer is represented as two separate ChamSys fixture profiles to comply with this limitation. Refer to the ChamSys channel map below for detailed channel allocation. When using Console Layers with ChamSys, set the DMX Mode of each Console Layer to ChamSys. This parameter can be configured in the Console Layer's Inspector panel under DMX → DMX Mode.
DMX-Channel Map for Console Layers with ChamSys Consoles
|
|||||||||||||||||||||||||||||||||||||||||||||||||||||||||||||||||||||||||||||||||||||||||||||||||||||||||||||||||||||||||||||||||||||||||||||||||||||||||||||||||||||||||||||||||||||||||||||||||||||||||||||||||||||||||||||||||||||||||||||||||||||||||||||||||||||||||||||||||||||||||||||||||||||||||||||||||||||||||||||||||||||||||||||||||||||||||||||||||||||||||||||||||||||||||||||||||||||||||||||||||||||||||||||||||||||||||||||||||||||||||||||||||||||||||||||||||||||||||||||||||||||||||||||||||||||||||||||||||||||||||||||||||||||||||||||||||||||||||||||||||||||||||||||||||||||||||||||||||||||||||||||||||||||||||||||||||||||||||||||||||||||||||||||||||||||||||||||||||||||||||||||||||||||||||||||||||||||||||||||||||||||||||||||||||||||||||||||||||||||||||||||||||||||||||||||||||||||||||||||||||||||||||||||||||||||||||||||||||||||||||||||||||||||||||||||||||||||||||||||||||||||||||||||||||||||||||||||||||||||||||||||||||||||||||||||||||||||||||||||||||||||||||||||||||||||||||||||||||||||||
Working with a Console Layer
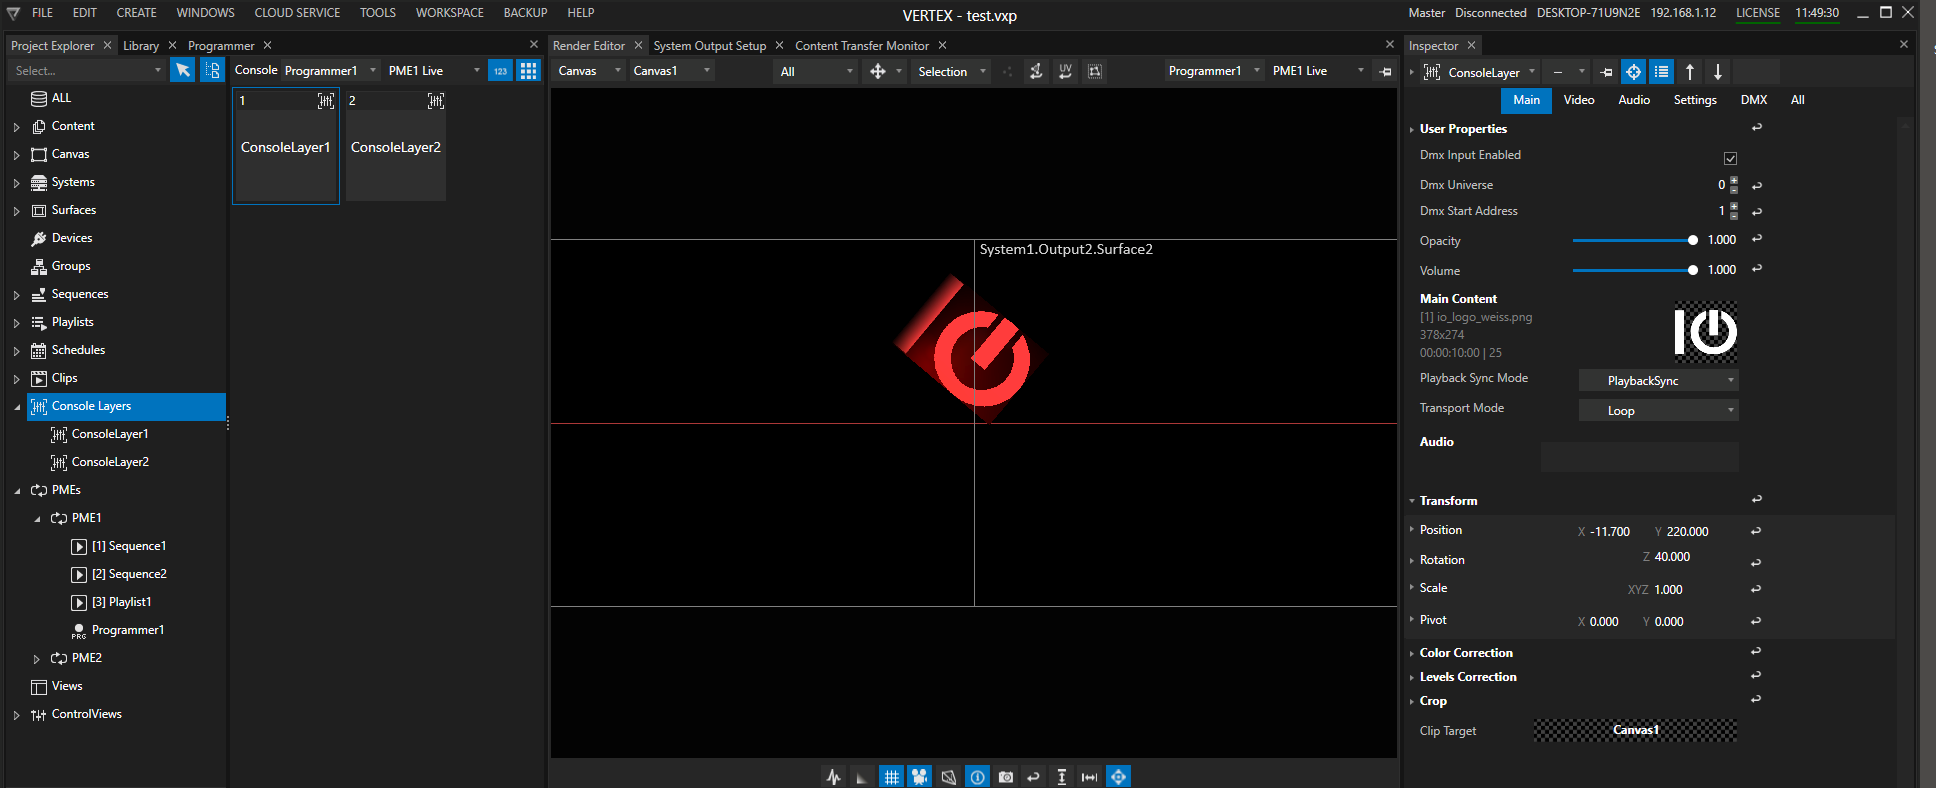
•Use the "Create " tab of the Main Menu to create a new Console Layer
•Right-Click on the ConsoleLayer section into Project Explorer and use the Context Menu the create a new one

•Select Console Layer into Inspector and do initial settings:
•Set the target Canvas on which the Content should be rendered
•Set the DMX universe and start address if the console layer should be controlled by a lighting desk.
Please do a DMX-Routing first. Check the Channel Map for a Console Layer in detail and learn more about which DMX-512 channel controls which parameter
 Unique start address for each Console Layer
please keep in mind to change the start addresses for every console layer.
To be control separately, each console layer must have it's unique DMX start address
•If you want to use DMX-Values to select Content from Project Explorer like a Gobo, set DMX File and Folder IDs for your Content.
Channel Map: Gobo 1 and Gobo 2
Gobo 1 in Channel Map is Property "Main Content" (Video tab in the Inspector)
Gobo 1 in Channel Map is Property "Mask" ( Video tab in the Inspector)

iris and color mixing on a test pattern
• Control Console Layer by external DMX or use the Inspector to do settings for all parameters

Shaper for a Test pattern Content
DMX Folder and File ID
•Each Console Layer is able to host Video Content and an Content Item as a Mask.
•With the concept of folder and file IDs you are able to select your content based on a DMX Value between 0 and 255.
•Each Console Layer has a DMX Channel/Address for Content Folder ID and Content File ID (Channels 49/50) and two Channels/Addresses for Mask Content Folder and Mask Content File (Channels 60/61). Please also compare with the full channel map of a console Layer
Example:
•Your Console Layer into VERTEX has DMX Start Address 1 (For universe routing, please read topic DMX-Routing before)
•Your lighting desk has a library element for a VERTEX Console Layer, also on Start Address 1
•you want to select a Content Item from the VERTEX Project Explorer with File ID 5 and Folder ID 2 as Video Content for this Console Layer
•you have to set DMX-channel 49 of your lighting desk to value 2 and DMX channel 50 to value 5
•The content item is selected as video content for the VERTEX Console Layer
Set File and Folder ID
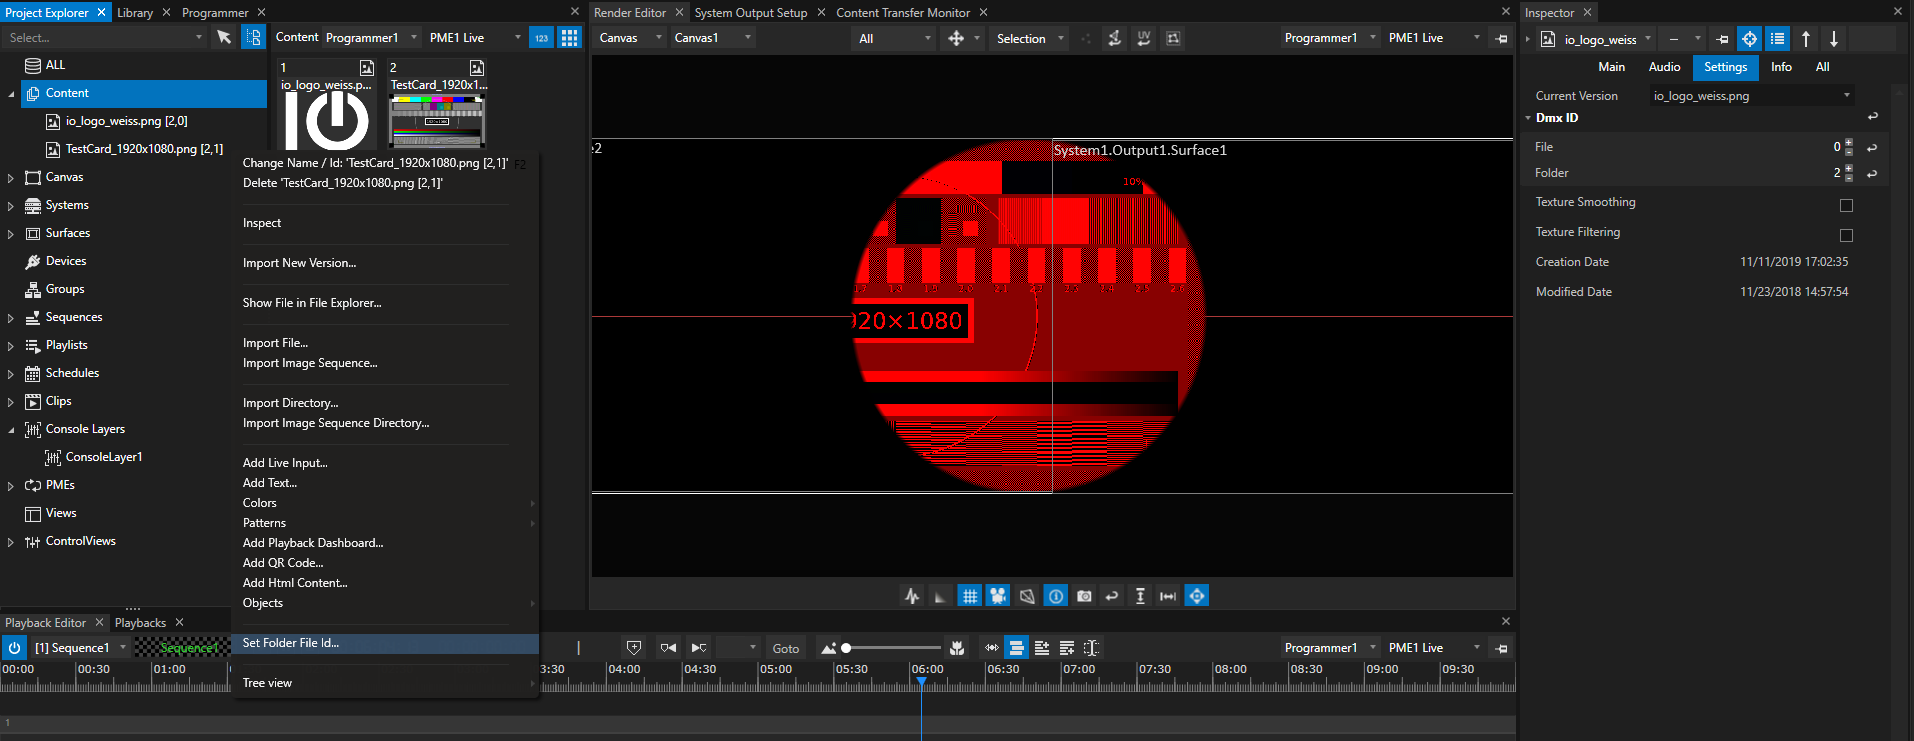
•Select a Content item into Project Explorer and go to the Inspector
•Go to the Tab "Settings" and Select "DMX ID"
•Set File and Folder ID for a Content. Each value has to be into the DMX parameter range from 0 to 255
Clip Container for a Console Layer
•Even for Console Layers you can create a Clip Container
•Used in a Playback, Clip Containers for a Console Layer overwrite the global value of the Console Layer

Global Setting for ConsoleLayer 1: Iris is set
•Drag a Console Layer from Project Explorer into the Playback Editor: A new Clip Container is created into your Sequence
•Assign Content to your Clip Container and set Values

Clip Container with Console Layer 1 inside overwrites the global values of Console Layer 1: in this example, all values for the iris are reset to default values.
Don't forget to also assign the same Main Content as the global Console Layer has to the Clip Container
 Use case example:
You are able to e.g. temporary take control back from a lighting desk control and to set all content to black.