•VERTEX Content Sync is based on a P2P file sharing technology. The higher the number of connected systems, the faster the network gets.
•Content is distributed automatically to all systems in a project. This process and its progress can be monitored in a window called Content Transfer Monitor.
•Content Sync works omni-directionally: Content can be imported both from any system and onto any system, whether working from a MasterSystem or SessionMember.
•Sync Modes and dedicated Target Systems can be set individually.
•For easy access go to your project's Content Management window
How VERTEX Synchronized Content Transfer Works
In most cases there is no special setup needed, as VERTEX transfers content between systems in the background as soon as a Session Member is added.
The exact details of each Content Transfer depend on from where the content has been added to the project. VERTEX distinguishes between local and remote systems.
 The system you are working on is your local system.
All other systems in your session are considered remote systems.
Default Setup
On your local system, VERTEX will process the original file in its source location. When adding content to your project, it will not be copied to the local project folder (unless you tell VERTEX otherwise).
The files that are being written in your local project's data folder are proxy files and thumbnails generated for preview.
Remote systems, however, will receive copies of the content source files as well as the proxies, thumbnails etc. in their project data folder.
Personalized Setup
If the aforementioned default mode does not fit your needs, you will find many advanced options in your project settings, system settings and content item settings. Here you can define sources, targets and formats of the content sync engine. To access advanced settings, switch to Advanced Mode in the status bar.
In the planning stage of your project - before adding any content or session members - it is wise to sort out the following:
•Know the difference between your local project path and the source path of your content on each system. This is important for both distribution and target of shared content data.
•What systems will render what parts of your content and how? -Some systems may only require a proxy file for preview, and that will save system resources.
•We recommend creating a designated content folder within your project folder and copying all content there before adding it to the project.
Settings
System Settings
Content Sync Tab
|
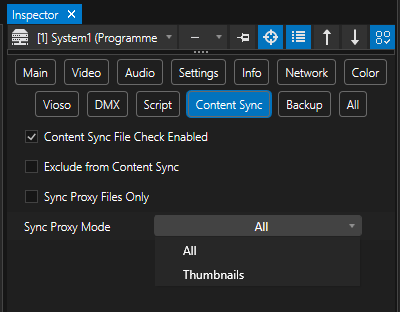
Content Sync File Check Enabled |
When enabled, VERTEX will regularly check on local content source files. |
Exclude from Content Sync |
Excludes this system from content sync when enabled. |
|
Sync Proxy Files Only |
Only proxy files will be transferred to this system, when enabled. Don't forget to set this system's Render Editor to proxy-mode if you use this setting. |
|
Sync Proxy Mode |
Choose whether you want to sync all proxies including videos or only thumbnails (still images) as your proxy files to this system. |
Network Tab - Content Sync Adapter
Select a network adapter for content sync transfers.
Use this feature to run Content-Sync on a separate network. This will help to speed things up when working with large amounts of data.
|
Default Project Path |
This is the folder that was set during the installation of VERTEX defining the default for your local project path. You can change it here to permanently define a different target folder or drive for all project files. |
Local Project Path |
Sets a target folder for all content transfers on your local system. |

Project Settings
Global settings for Content Sync
|
Auto Content Sync To All Systems |
Enabled by default, will be transferred automatically to all Systems. |
Content Sync Enabled |
When enabled, content items will be transferred by |
|
When enabled, the source file will be copied to the project folder. This is important when adding content from an external drive. |
||
Disable Content Sync on File Import |
only a proxy will be transferred on import |
|
Peer To Peer Transfer |
A P2P network is using all Session Members for the fastest possible transfer. When disabled, transfers will be processed one after the other from Source System to Target System. |
|
Content Sync Items |
items currently being transferred |
|
Content Sync Missing Items |
items still missing in current transfer |
|
Content Sync Mode
|
No Sync |
no content will be transferred |
All |
content will always be transferred to all Systems |
|
All Or Targets (default) |
transfers content to either all systems unless items have specified Target Systems assigned. |
|
Targets Only |
content will only be transferred to Target Systems. |
|
Proxies & Targets Only |
only proxy files will be transferred unless items have specified Target Systems assigned. |
|
Content Sync Transfer target file path for transferred source content
|
Project Path (default) |
creates a content folder in the project's data folder - i.e.: |
Relative Path
|
creates a file path within the project folder relative to the original path. Let's say you imported content from C:\Movies, then VERTEX will create a file path like this on the other Systems in your Session: C\....\PROJECTNAME\Resources\C\Movies |
|
Source Path |
creates a file path exactly like the original source path. When importing from e.g. C:\Movies, all receiving Systems will have a path called C:\Movies created. |

Target Systems
This feature allows users to transfer content exclusively to particular Systems, specified as Target Systems.
This property is located in the Inspector of Content Items as well as Clip Containers.
By default, there are no targets assigned: all content will be distributed to all Systems. To assign a Target System, drag a System from the Project Explorer onto this property.


In order for Target Systems to work effectively, you need to go to Project Settings > Content Sync and set Content Sync Mode to any option with Targets.
Otherwise your data will be distributed to all Systems and not just to the specified targets.
Target Systems Workflow
Let's say you have heaps of content to import and would like to route many files to a Target System.
To save you the trouble of inspecting and assigning each item individually, you can automatize this process with a choice of two convenient workflows:
Import Content via System > Context Menu
1.right-click on a System tile in the Project Explorer and select from the Import Content options
2.this System will be automatically assigned Target System for any content imported this way
Target Systems Assigned To A Collection
1.add a Collection to the "All" Section in Project Explorer (right-click on ALL)
2.drag & drop one or more Systems onto this Collection
3.access the Collection's context menu by right-click and import your content from there
4.all content imported this way will have the Systems within this Collection assigned as Target Systems
5.the Systems within this Collection are set as Target Systems for all content you import this way

Content Transfer Monitor

VERTEX Content Transfer Monitor displays all current content transfers in your project. When this window is empty all transfers are either finished or have not started yet.
Its RESET button restarts VERTEX Content Sync Engine and should be only used when Systems have been connected or disconnected to the project (see below).
Content Management Window
This window is a great tool to supervise and manage your content across all Systems.
Here you can monitor individual content items and adjust their settings such as:
- usage
- source path
- exclude / suspend from Content Sync
- sync state
- copy to project folder
- set Target Systems
- find specific content items with a filter string (by content type, collection or custom keyword)
Go to MAIN MENU > WINDOWS > Content > Content Management

For further actions such as Delete Unused, click on the menu icon in the top bar:

Reset Options For Content Sync
There are many options to refresh, reset and restart Content Sync. Those options will mostly be necessary in case some content is not distributed properly due to Systems being added or disconnected to your Session.
You can command all reset options in the Project Explorer by the context menu on three levels:
•right-click on an individual content item and reset Content Sync for just this item:

Refresh Proxy & Cache Files, for example, will restart the encoding process and the re-calculated files will be distributed by Content Sync.
•there are similar options for all content items globally, if you right-click on Content in Project Explorer's tree view:

•and a right-click on a System tile will give you options to reset/ refresh Content Sync per individual Systems:
