•VERTEX supports different types of live inputs and capture cards
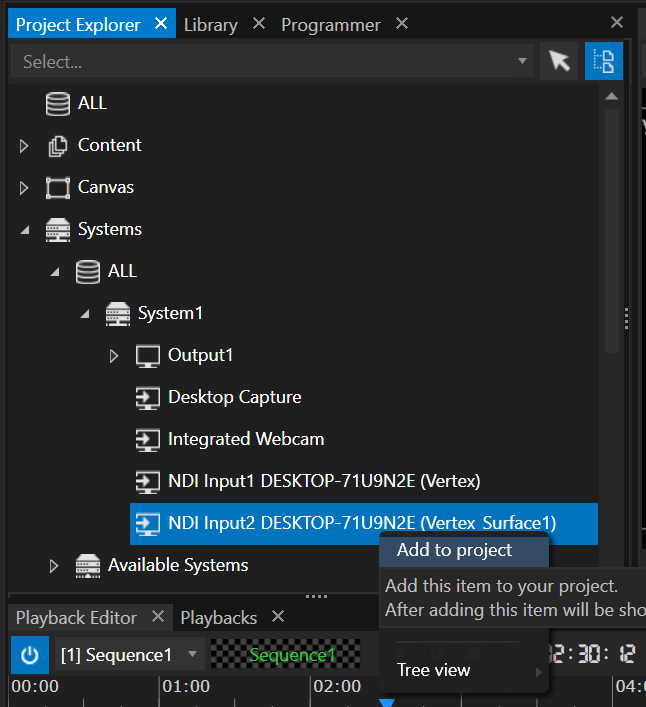
•Live Inputs that are available for a System are shown in the Project Explorer as child elements of this System
•Live Inputs first have to be added as Content Items to your Project (right-click on Live-Input -> Add to project)
Capture Cards
SUPPORTED MODELS AND MANUFACTURERS
VERTEX can support a variety of input cards from different manufacturers, such as:
•AJA
•Blackmagic Design
•Bluefish444
•Magewell
•Datapath
•DeltaCast
•Deltacast FLEX
•Magewell
•Osprey
•Streamlabs
Each product has to be verified with a current driver and VERTEX version, due to the nature of the fast moving industry.
For most applications we recommend Blackmagic oder Magewell cards. We also recommend testing the compatibility of your hardware with our free VERTEX trial version.
If you need to request further assistance, please reach out to vertex.support@rossvideo.com.
 Follow the instructions of the manufacturer installing the hardware and the driver.
Once the driver is installed, VERTEX will detect your input card to be accessed in the Project Explorer's System Tree View.
ADDING LIVE INPUTS TO YOUR PROJECT

After an Input Card and its driver is installed, the Input Card should be listed as child element of your Vertex System into Project Explorer.
•go to Project Explorer and navigate to the System where the input device is installed
•select the input device
•right-click with your mouse and open the context menu
•select "Add to project"
•the input device now is listed as a content item in the Project Explorer
•drag the live input content into the Playback Editor
RE-SCAN VIDEO SOURCES
If your input device is not listed as a child element of a system in the project explorer, please refresh the video sources:
•select System in project explorer
•right-click with your mouse and open context menu
•select "Re-Scan Audio & Video Inputs"

If the input texture of your capture card has a wrong resolution, try to reset your video inputs
•select System in project explorer
•right-click with your mouse and open the context menu
•select "Reset Video Inputs"
NDI
This product uses NDI® (SDK v5.0, 2023)
Licensed for free and commercial use under the terms in effect for this version.
Learn more at https://ndi.video/
NDI® is a registered trademark of Vizrt NDI AB.
•VERTEX automatically detects NDI streams in your network.
•Each detected stream is listed as a Live Input Element in Project Explorer > Systems Manager > System
When no NDI Stream or a wrong number of streams is detected, try to refresh the Video Sources of your System:
•Select your System in Project Explorer
•open the Context Menu with a right-cklick
•select "Refresh Video Sources"
Add NDI to your Project
•Navigate to your System into Project Explorer
•Open the tree and show child elements of your System
•Right-Click with your mouse onto NDI Receiver
•"Add to Project"
•The NDI Receiver now is listed in the Content Section into Project Explorer
•Drag this NDI Content to the timeline of the Playback Editor and create a Clip Container

Desktop Capture
•Captures the Windows Desktop of a System
•Shows Mouse or Touch Interactions
Add a Desktop Capture to your Project
•Navigate to your System into Project Explorer
•Open the tree and show child elements of your System
•Right-Click with your mouse onto Desktop Capture
•"Add to Project"
•The Desktop Capture now is listed in the Content Section into Project Explorer
•Drag this Desktop Capture Content the timeline of the Playback Editor to create a Clip Container
Camera
VERTEX supports all cameras that are working with Microsoft Windows after drivers are installed:
•integrated webcams
•USB webcams
•some ethernet- based cameras

Add Camera Live-Input to your Project
•Go to Project Explorer and navigate to your local system
•If cameras are detected from VERTEX, they should be listed as child elements of this system.
•Open the context menu with a right-click.
•"Add to project"
•The camera is now listed as a content item in the content section.
•Drag the camera content as a clip container into the timeline of the Playback Editor.
Spout
 Spout is an open source video texture sharing framework for Microsoft Windows.
With Spout it is possible to share video or graphics textures in realtime between windows applications on the same System.
Spout is supported and integrated by a lot of creative applications.
All information including a Spout test sender and receiver could be downloaded on the Spout Website
Add Spout to your project
•Check if there is an active spout sender from another application active on your Windows System
•Go to the VERTEX Project Explorer and navigate to your local System
•Spout should now be listed as Live Input and child element of your local System
•If Spout is not listed in input branch of your local System's tree view: right-click on the System to access the context menu and select Reset & Refresh > ReScan Audio & Video Inputs.
•Right-Click on the Spout element and select "Add to project"
•Into the Content Section, Spout now is listed as Content of your project
•Select Spout from Content and drag it to the Playback Editors timeline to create a clip container
Create a Spout Output from VERTEX:
Any Surface in VERTEX can render its texture as a Spout Output. Inspect the Surface, go to Settings tab (in advanced mode) and enable Spout Output.