A helpful tool for keeping track of content-related topics is our Content Management Window (MAIN MENU > WINDOWS > Content > Content Management).
Here you find a consolidated overview of all content files in your project with relevant information on:
•where the content comes from,
•where it is supposed to be,
•and where it actually is now.
Additionally, in this window you can reach the relevant tools to clean up content items (CleanUp) or change assignments.
Case A: Standalone SystemA to Standalone SystemB
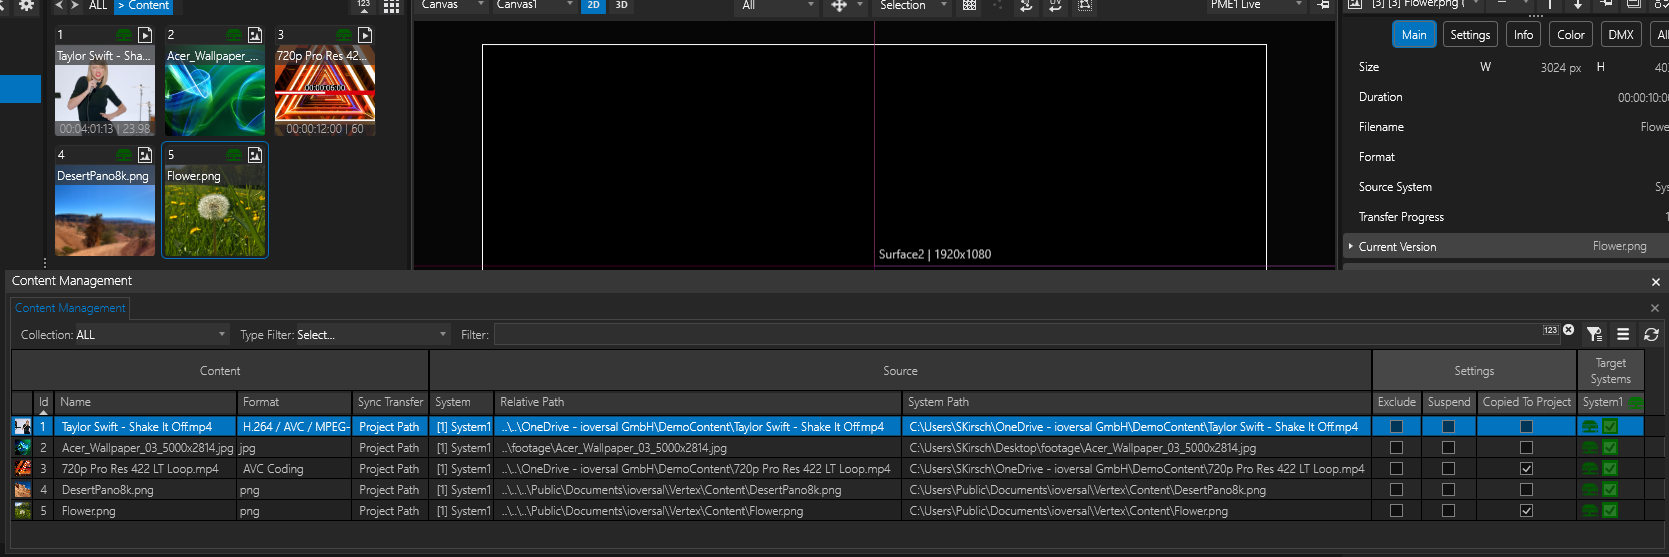
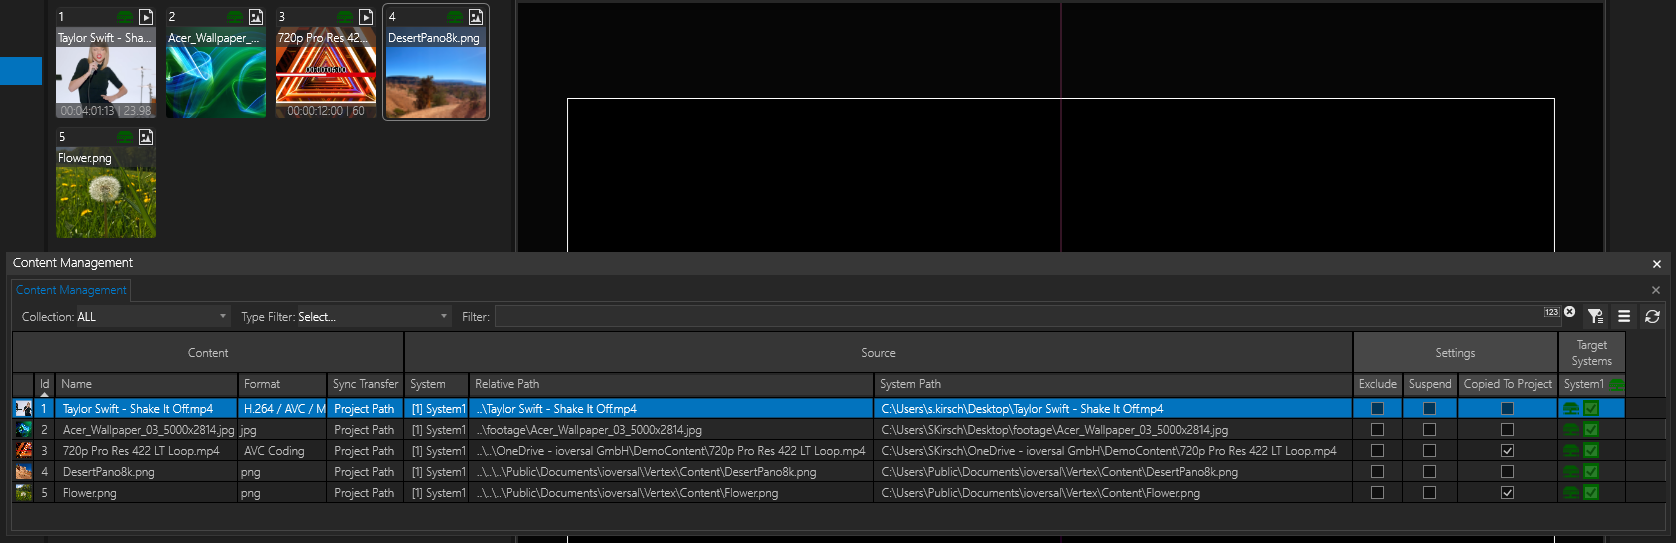
Let's assume you have prepared the project on SystemA and want to transfer it to SystemB using a hard drive. The following sample project contains four content files, each given distinct characteristics to demonstrate different effects.
Content1 was imported from a unique directory, which will not be accessible on other systems via an absolute path. It also won't be found through the relative path since, relatively speaking, it won't be discoverable from the project file due to its deep location in the system-specific folder structure.
Content2 is also in a directory inaccessible by absolute path on other systems. However, in this case, the relative path from the ProjectFile is easily accessible. For example, the content is just one level higher in a "footage" folder. This offers a good chance that the file might be stored identically on SystemB relatively.
Content3, like Content1, is in a directory that won't exist on SystemB both absolutely and relatively. However, the "Copied to Project" property has been activated. This ensures the file is placed in the data directory of the project folder, thus easily archived together with the project. If the property is activated after import, the file is copied into the project directory if the source file is still available on the source system. A good use case here is importing files directly from an external hard drive. "Copy Content to Project Folder" can be activated in the "Content" category of the ProjectSettings and will apply to all subsequently imported contents from the moment of activation.
Content4 is in a directory that exists absolutely on both SystemA and SystemB. SystemB will find the file directly here.
Content5 is also in a directory existing on SystemB just like Content4. Additionally, "Copied to Project" is also enabled here.
Here is a screenshot showing the state in the Content Management Window on SystemA:
Opening a Vertex project file on another system:
When opening the project from SystemA on SystemB, Vertex will ask in a popup, "Do you want to map the Local System to the Master System?". By answering "Yes" to this, the project's Master System (originally SystemA) will now be reassigned to SystemB. If you were to answer "No", SystemA would remain Master in the project, and SystemB would only be added as a SessionMember. The latter method is well-suited for making offline changes to the project that you want to transfer back to the original Master later. Example: you have an event with stationary Vertex systems and want to continue working on the project off-site on your laptop - like from your hotel room in the evening.
The entire project directory, including project files and the Data folder with all subfolders, was copied to the hard drive. Additionally, the "footage" folder and the individual file "Content1" were also copied. Content4 and Content5 were not copied to the disk for transfer because they already exist on SystemB under the same path (in this case, the contents were from the Vertex Library). All files from the hard drive were placed in any directory on SystemB, without altering the relative folder structure.
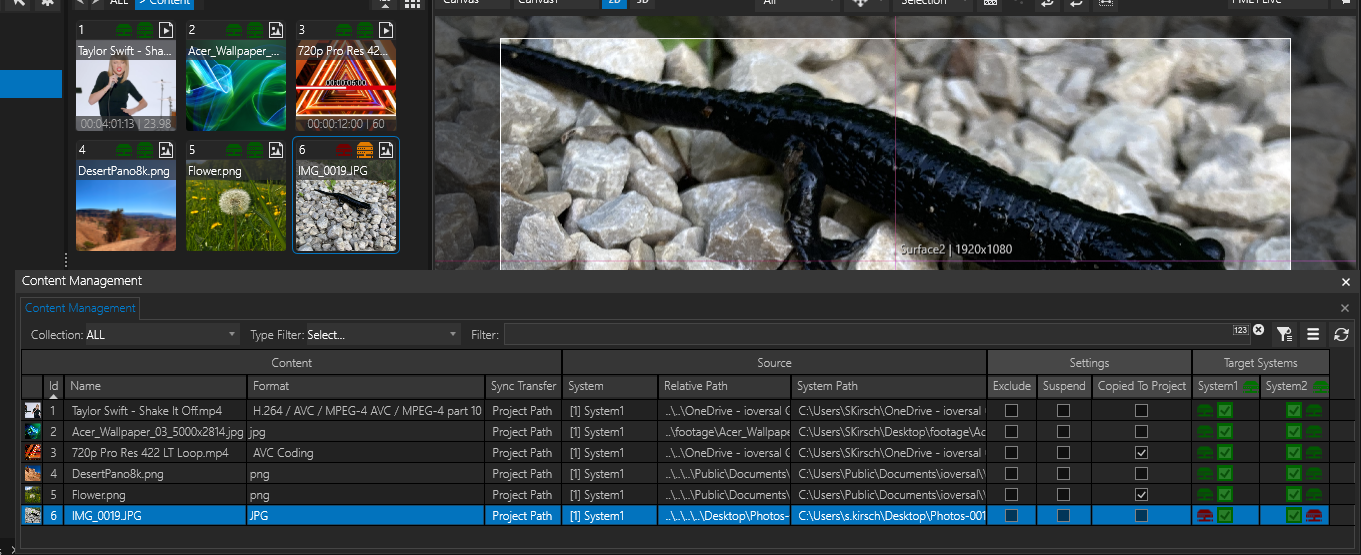
The following screenshot shows the state after opening the project on SystemB:
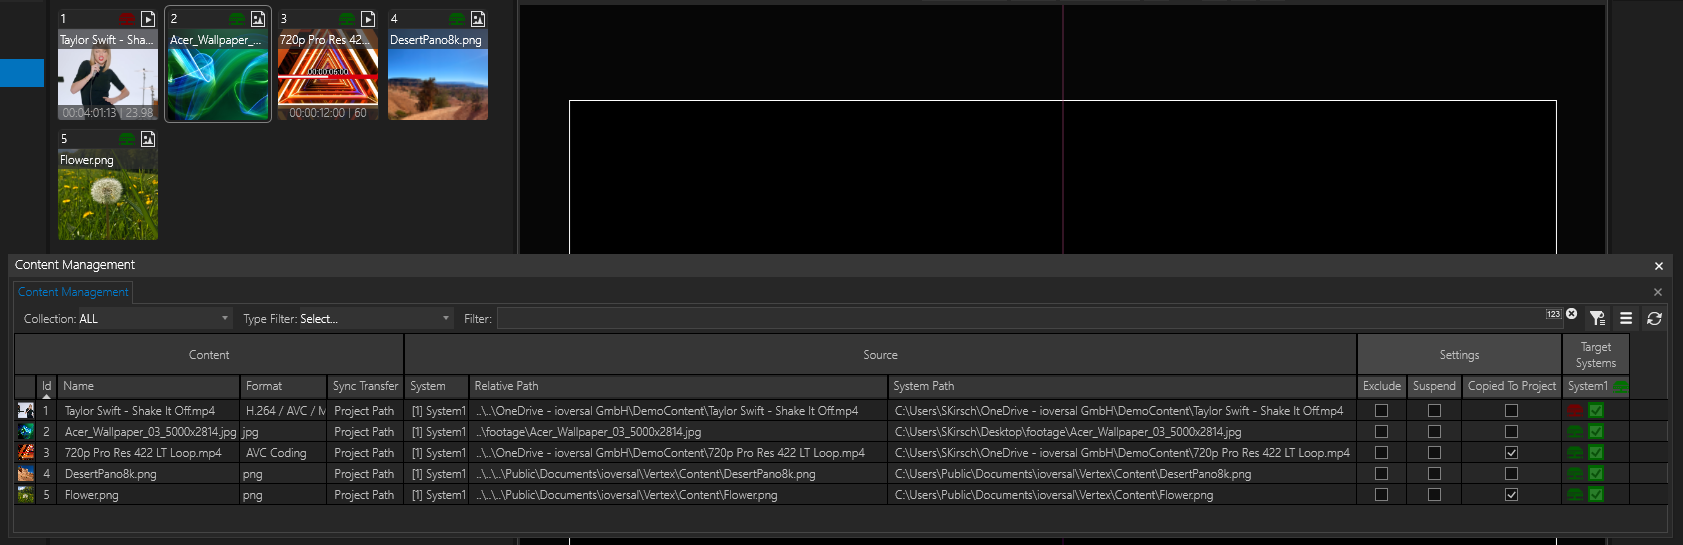
•Content1 could not be found for the reasons mentioned. The red icon in the Project Explorer content tile and in the Content Management Window indicates this.
However, Content2 through 5 could be found directly on SystemB:
•Content2 could not be found via the absolute path because it does not exist on SystemB. However, the file could be found via the relative path.
•Content3 could neither be found via the absolute path nor the relative path. Since the file was transferred as a copy to the project directory on SystemB due to the activated Property "Copied to Project", Vertex was still able to find and assign the file in the project directory on SystemB.
•Content4 could be found absolutely, relatively, and via CopiedToProject.
•Content5 could be found both absolutely and relatively.
Content Path?
The question arises as to which particular file Vertex uses in case the file can be accessed via a relative path, system path (absolute path), and "Copied To Project" path:
The "Copied To Project" path takes precedence! Even if the file is available absolutely or relatively, the copy automatically stored in your Project folder's Data directory is used, provided that it exists and the "Copied To Project" property is activated in the content. If one of the two conditions is not met, Vertex will attempt to revert to the relative or absolute path.
In the Project Settings, under the "Content" category, the property "Default File Source Mode" (currently only visible in Advanced Mode) can be used to define how or in what order Vertex searches for the file. Our default is "Original Path First," which refers to the "System Path" or the absolute path. Other options include "Project Path First" (relative path or local cache file on Session Members), "System Path Only," and "Project Path Only."
To establish the link to Content1 on SystemB (the file was copied from the hard drive to SystemB, but the path is not yet known to Vertex), please use the "Relocate Source Paths..." option from the context menu:
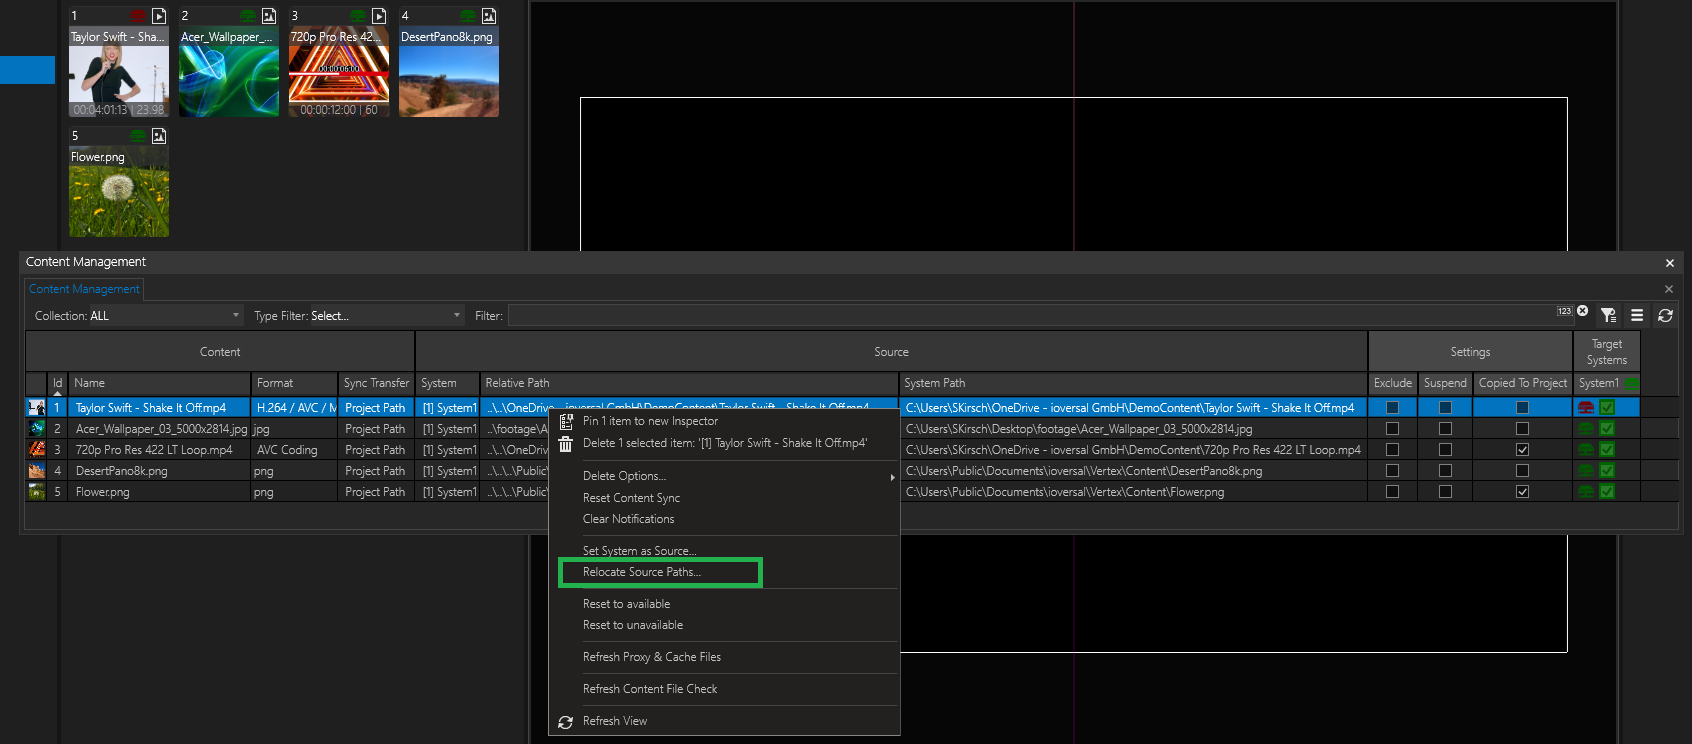
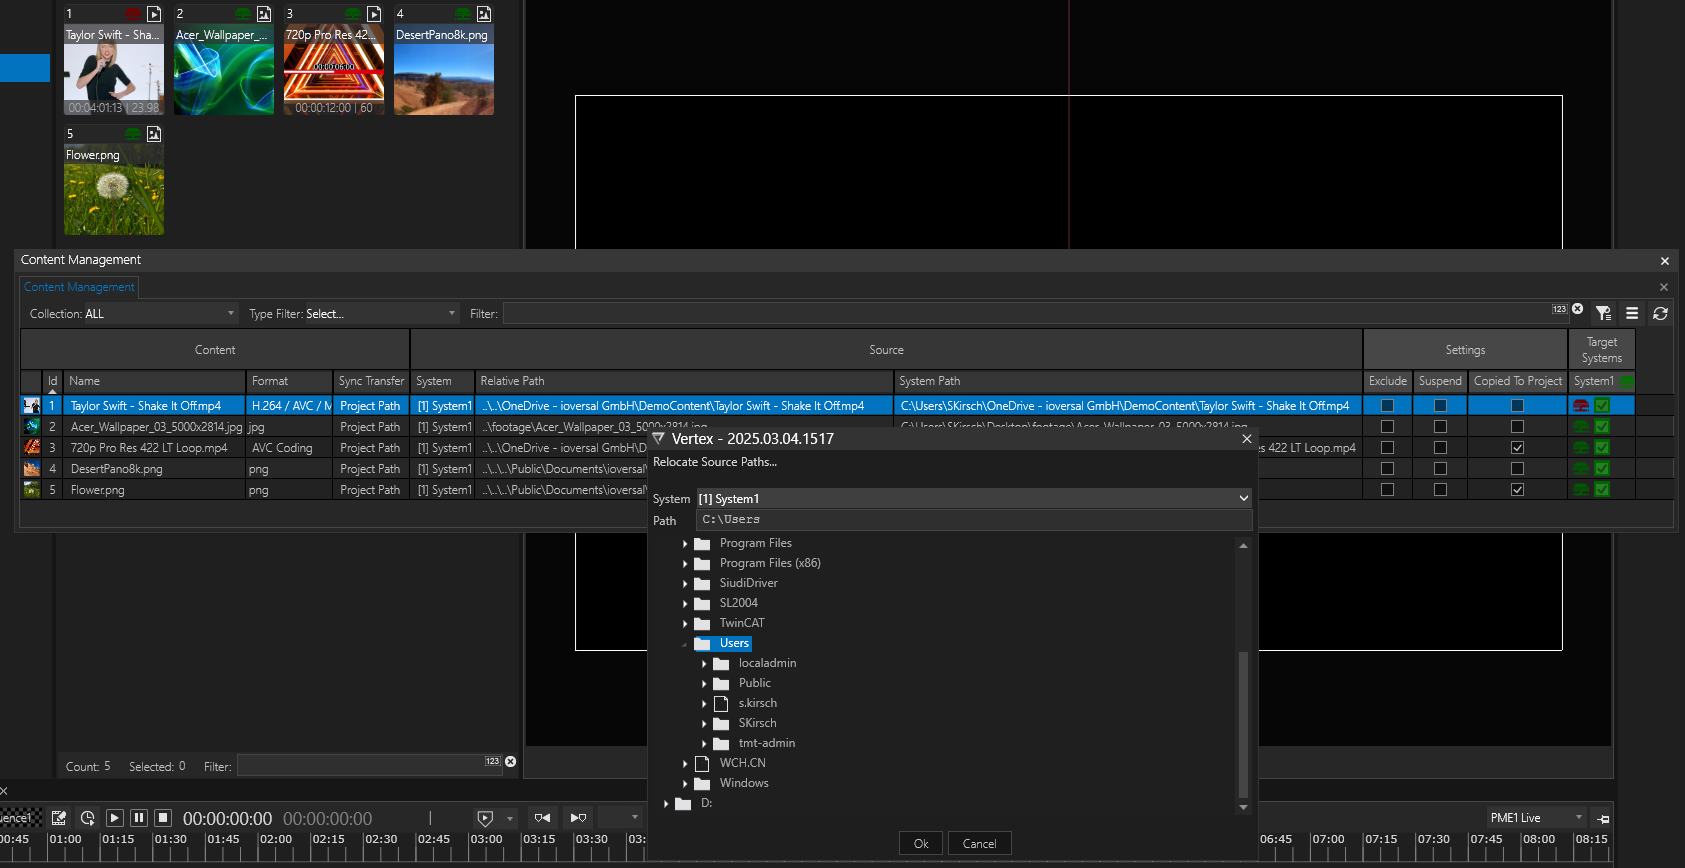
In this dialog, you can use the remote file explorer to select the appropriate folder on a system where the file can be found on SystemB (see screenshot). This dialog can also be executed on a multiple selection of contents, and it is not necessary to select the final folder. The system traverses through the folder tree starting from the selected folder until it finds a file with the desired file name to link it with the content in Vertex. After using the Relocate tool, a refresh of the view in the Content Management Window might be necessary. It may also take a few minutes for the red icon to turn green because this file check is performed in an internally specified cycle. This "Content File Check" can also be triggered manually via the context menu in the Content Management Window of a content by selecting "Refresh Content File Check."
After using Relocate Source Path, all content files are linked correctly on SystemB (see screenshot below).
Summary:
You have different options to transfer the project and its content files:
1)Place all contents on SystemA either in a directory that is also accessible as an absolute or relative path from the project storage location on SystemB and manually copy the content there.
2)Activate the "Copied To Project" property for contents on SystemA that are inaccessible from SystemB before saving, or activate the property at the beginning of the project on SystemA in the project settings.
3)Use "Relocate Source Path" after loading the project on SystemB to assign the new and correct paths to the contents
Case B: Archiving a project where content from different systems has been added to the project.
•Vertex allows content from any system to be added to the project.
•The corresponding "Source System" is therefore stored as a property in each content.
•These contents may not be available on all other systems, as targeted assignment of contents to systems was made with target systems, or some systems (e.g., operator laptops) may have received only proxy files or thumbnails, but not the original files.
•Therefore, it cannot be guaranteed that every system has every content at all times, meaning the complete project cannot be archived from every system at all times.
To correctly archive a project, it must be ensured that this export is carried out on a system where all content is available.
We recommend using the Master System for this and assigning the Master System as the "Source System" of each content:
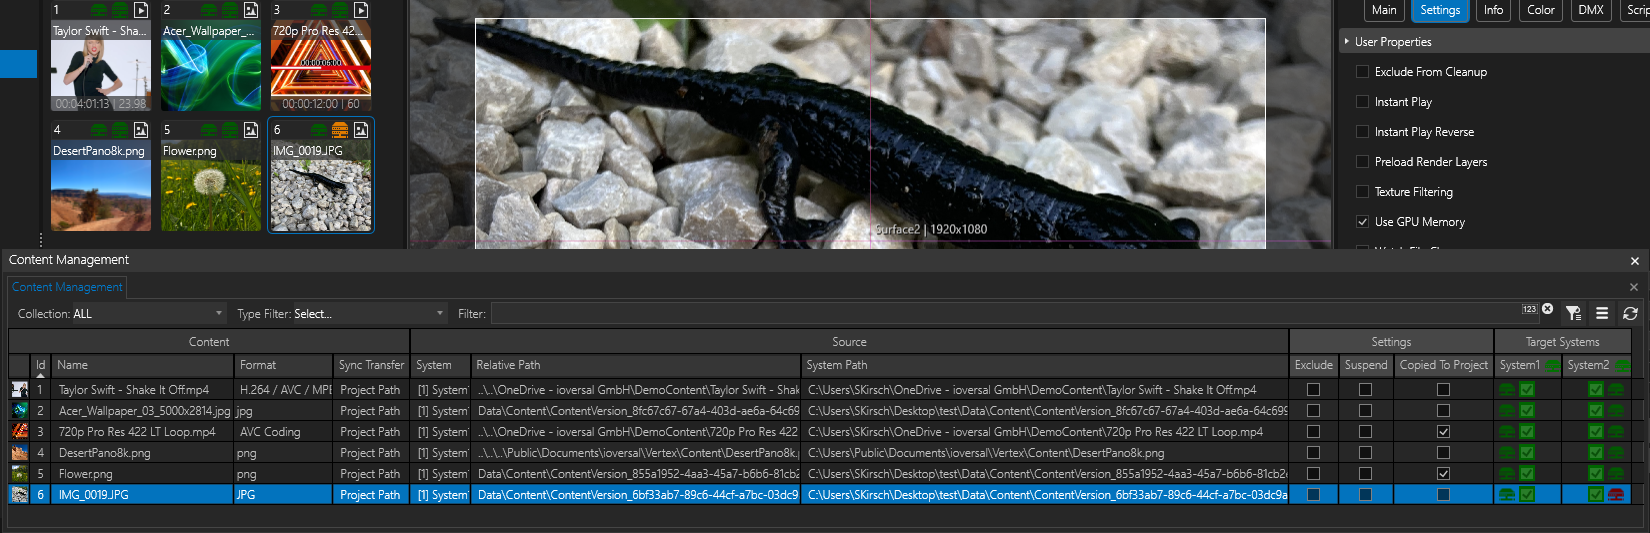
The following screenshot outlines a case where Content1-5 was imported from System1, while Content6 was from System2.
There are also absolute and relative paths for Content6 that match System2 but not System1.

Content6 is in the local project path of System1 and can be rendered; however, this does not initially help establish the reference to the content. Assigning "System1" as the source system to the content means the file couldn't be linked with the content, as the given absolute and relative paths still refer to the file on System2 (see screenshot).
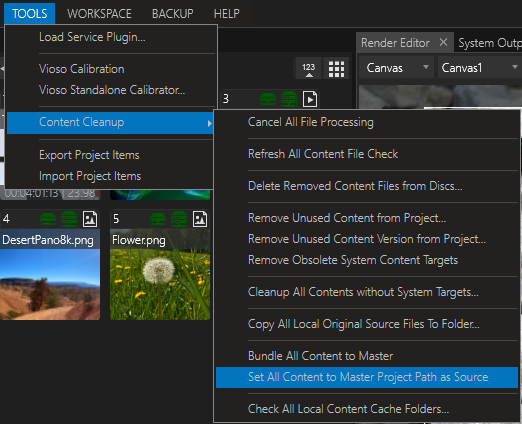
To correctly resolve these paths, you can now execute "Set All Content to Master Project Path as Source" MAIN MENU >TOOLS > Content Cleanup (see screenshot).
As a result, content items are now automatically linked with the files stored in the Master's local cache folder, provided these match the original file in resolution and quality (see screenshot).
You may optionally activate the "Copied To Project" property for all content items to ensure the files are included in the project folder's Data directory.
Alternatively, decide to manually archive contents that may still be stored in other directories along with the project. However, care must be taken to ensure the correct relative folder structure and reachability of the file from the project's file location.