•For synchronized playout of media across multiple systems it is mandatory to precisely align their display rates and to force all GPUs to generate their frames at a coordinated time.
•VERTEX fully supports NVIDIA GPU synchronization by utilizing NVIDIAs frame counter as an optional VERTEX Systems Sync Clock source. Hence, GPU sync does not synchronize on hardware level only.
•The interface to NVIDIAs API ensures that textures on multiple VERTEX instances are generated at the same rate on all systems.
•As NVIDIA Quadro Sync II cards also support external references / house sync (“Genlock”) as their clock source, VERTEX is also able to connect to these reference signals.
The procedures described in this manual summarize some complex third-party topics. We recommend to additionally study these documents/pages for deeper insights and troubleshooting advice:
NVIDIA Quadro Sync II Card Setup:
https://www.nvidia.com/content/dam/en-zz/Solutions/design-visualization/quadro-product-literature/du-08348-001_v03.pdf
NVIDIA EDID Emulation:
https://nvidia.custhelp.com/app/answers/detail/a_id/3569/~/managing-a-display-edid-on-windows
NVIDIA MOSAIC setup:
https://nvidia.custhelp.com/app/answers/detail/a_id/3568/~/how-to-setup-mosaic-using-nvidia-control-panel
Requirements
•Systems equipped NVIDIA Quadro RTX GPU.
•NVIDIA Quadro Sync II Card installed in each System that needs to playout in sync.
•Optional: external sync clock source / reference generator (genlock).
 Note: The master system does not necessarily need to have a Sync Board neither a Quadro RTX GPU if it is not playing out any video. Only if you need to apply the Master role to an actively rendering System that is part of a synchronized playout, this System needs to be part of the NVIDIA Sync Group and a Quadro RTX card and Sync Board is required.
Hardware Setup
Install the Quadro RTX GPUs and Quadro Sync II Cards on your mainboards PCIe ports. Connect all systems GPUs that need to be synchronized to any available GPU Connector of your Quadro Sync II Card using the NVIDIA Sync Cables.
It is important to provide the same resolution and display rate (most likely even the same EDID) for every Systems GPU output. If different resolutions/EDIDs are involved, make sure to isolate these to dedicated Systems, each hosting only one type of EDID.
•If running different EDIDs on one GPU, setting up a NVIDIA Mosaic will not be possible anymore which impacts both performance and synchronization.
•If running different EDIDs on one system, though grouped together on dedicated GPUs, setting up a single NVIDIA Mosaic will not be possible anymore which impacts both performance and synchronization.

We recommend disabling additional GUI GPUs as well as all mainboard display outputs prior to NVIDIA and VERTEX setup in order to avoid complications during setup and runtime. If additional GUI outputs are needed, please try enabling them after successful setup and perform an in-depth before-after analysis of the Vertex systems rendering performance. Disable additional outputs if the performance decreased.
Note: ensure all NVIDIA Quadro GPUs are installed in x16 PCIe ports of your mainboard. Check whether your CPU/Mainboard supports the required quantity of total PCI lanes to unlock the required performance of the system.
Cabling
After setting up the individual Systems, establish a physical connection between all systems of your cluster:
▪One system needs to be set up as “Frame Lock Master” / “Timing Master”.
▪Start your signal chain from the timing master: connect a CAT 5 cable between the Frame Lock connectors on the timing master and a client machine.
It does not matter which connector you use. Both RJ45 ports on the Quadro Sync Board can be in- or output. It is recommended to create two signal chains off the timing master.
▪Daisy chain all Clients.
▪Do not connect the Quadro Sync II cards to TCP/IP networking equipment. Although it’s the same cable, damages can occur to both the Quadro Sync II cards as well as to networking equipment.
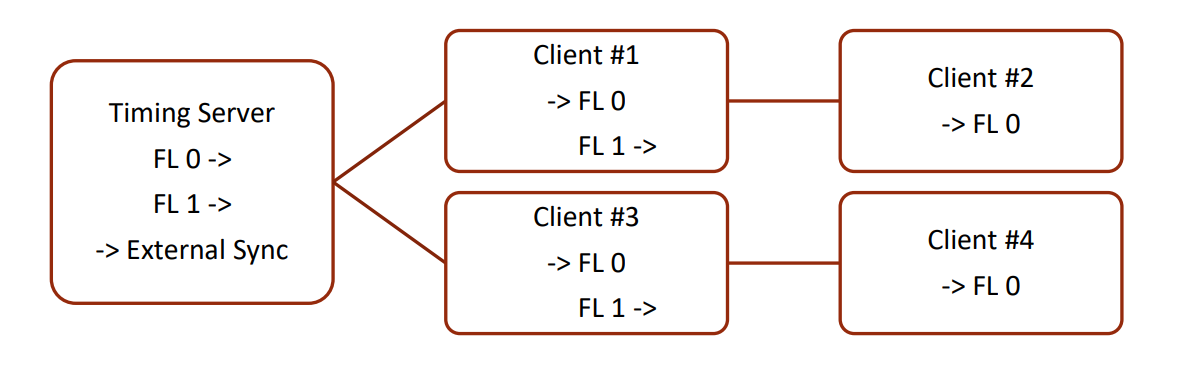
Note: When synchronizing to an external clock, connect the BNC cable to the Timing Masters Quadro Sync II card.
▪The state of the port is indicated by a Small LED on the port:

NVIDIA Setup
Make sure to install the same NVIDIA Quadro RTX display driver on all systems. Vertex usually works best with the latest stable releases.
1.EDID Emulation: Load Display EDIDs for all connected displays in System Topology Menu.
2.Mosaic Setup: Create a single Mosaic with all displays aligned horizontally.
3.Reboot System to ensure NVIDIA driver kept all settings.
4.Synchronize Displays
a.Start with the Timing Server Master. Choose the time server is “On this system” (edit Settings to configure external reference) and apply.
b.Continue with all Client Systems. Choose the time server is “On another system”, select the Mosaic Display to lock to the time servers clock and apply.
VERTEX Setup
Once the NVIDIA GPU sync setup is complete, launch VERTEX on all systems and connect to your session.
The following example setup consist of 3 VERTEX systems in a session: 1 VERTEX Director as master, 2 VERTEX Nodes as session members for playout.
The configuration can be set up by any system in the session, regardless of the local availability of a Quadro Sync II card.
VERTEX Director |
System Settings: |
Video Content > Settings: Also, ensure all video content for this project created and imported with the corresponding fps. |
.
|
|
|
VERTEX Node 1 |
System Settings > enable GPU Sync Server > enable Full Screen Exclusive Mode > set Exclusive FullScreen Hz to 60 > disable Topmost > enable Check Drop Frames (optional) |
Workflow for using GPU Sync Target IP: 2) then set the Target IP 3) enable GPU Sync Server again.
|
VERTEX Node 2 |
System Settings > enable GPU Sync Client > enable Full Screen Exclusive Mode > set Exclusive FullScreen Hz to 60 > disable Topmost > enable Check Drop Frames (optional) |
Server and client require either a NV GSYNC connection or receive both external sync clock signal. If resolving to an external sync clock source, please set both Vertex Nodes Sync clock to Local Clock.
|
Testing the setup |
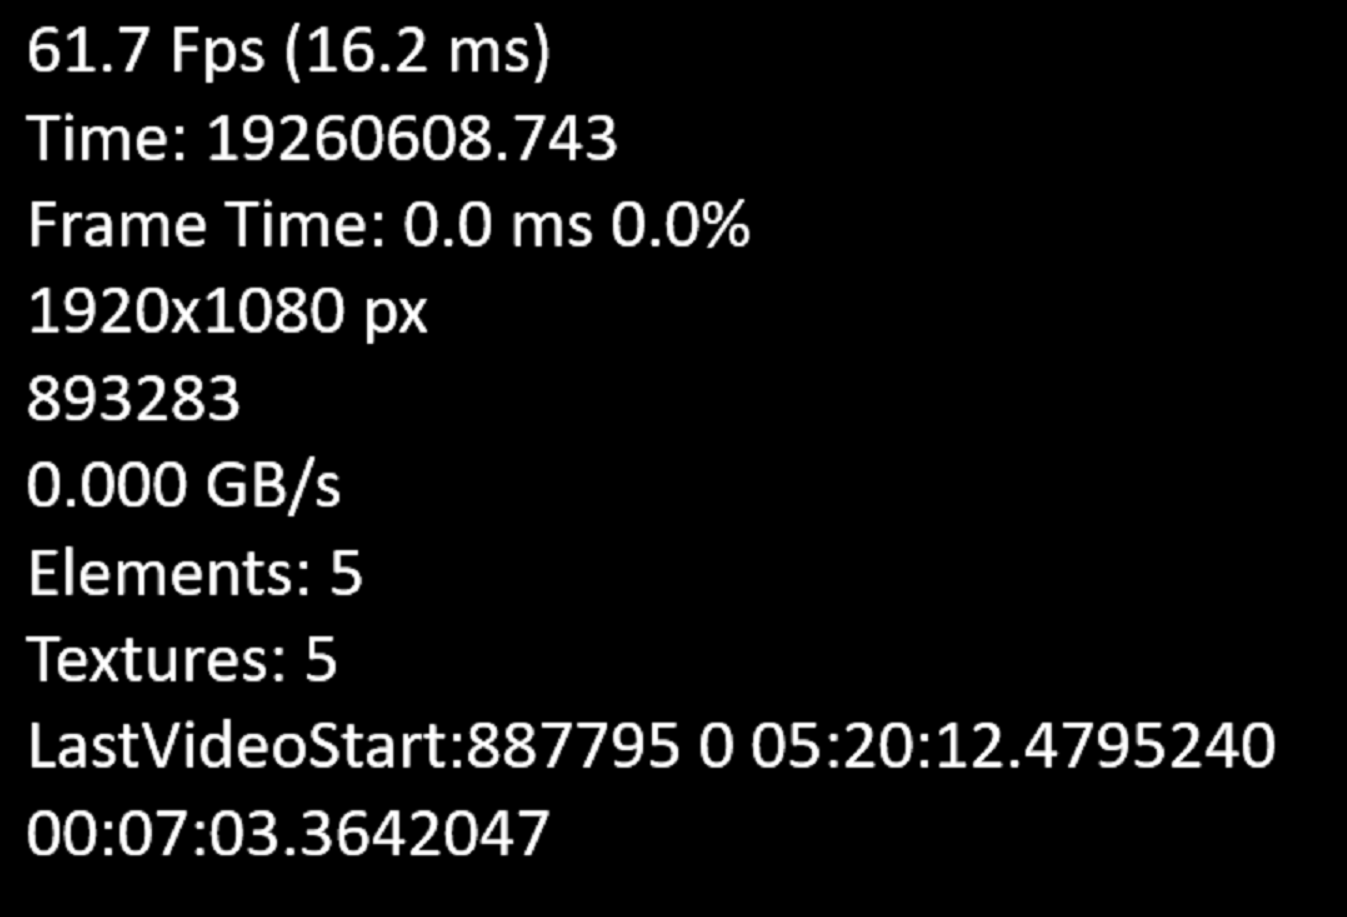
enable Show Status in Fullscreen on all GPU synchronized Systems.
This will embed synchronization information on the systems fullscreen rendering outputs, as shown on the right ->
Frame counter (located underneath pixel resolution) should display the same frame across all GPU sync'ed systems.
LastVideoStart displays the global rendering frame counter on which the current video clip started. If the setup has been performed correctly, this will display the same frame count across all GPU sync'ed systems.
Once all tests have been satisfactory, you may disable Show Status in Fullscreen and proceed to play out media. |
 Status in Full Screen |


 Once GPU Sync is activated, no client will be rendering new frames unless the server is doing so.
This may lead to still frames on all Client systems until the GPU Sync Server is sending running clock signal again.