•Generally, there are 2 backup modes in VERTEX: partial backup and redundant backup.
•Default backup mode is partial - the mode can be set in the project settings or by a script command.
Backup Configuration
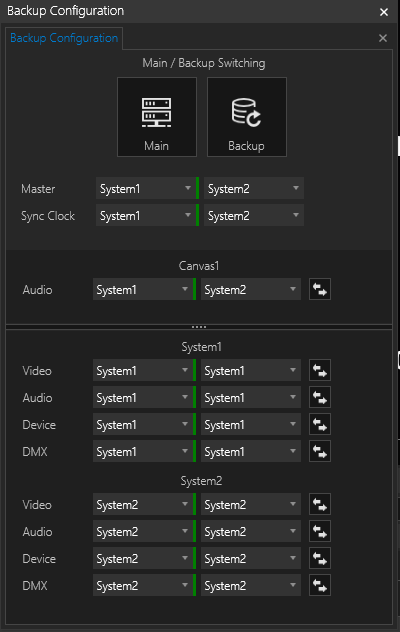
The Backup Configuration window allows managing the amount of backup systems per project with ease and flexibility.
The buttons Main & Backup on the top will switch between the designated system configurations that can be set on the bottom of the window.
Backup Mode
Partial Backup:
A backup system is a session member that takes over the role of another session member or the master.
Any system in your project can become Master or take over various tasks of another system such as rendering video, audio, or managing DMX devices.
Redundant
Your cluster of live systems is mirrored as a whole on a backup group, consisting of the same amount of systems.
Set Backup Mode
The default mode for backups is Partial
The mode can be set in the Project Settings.
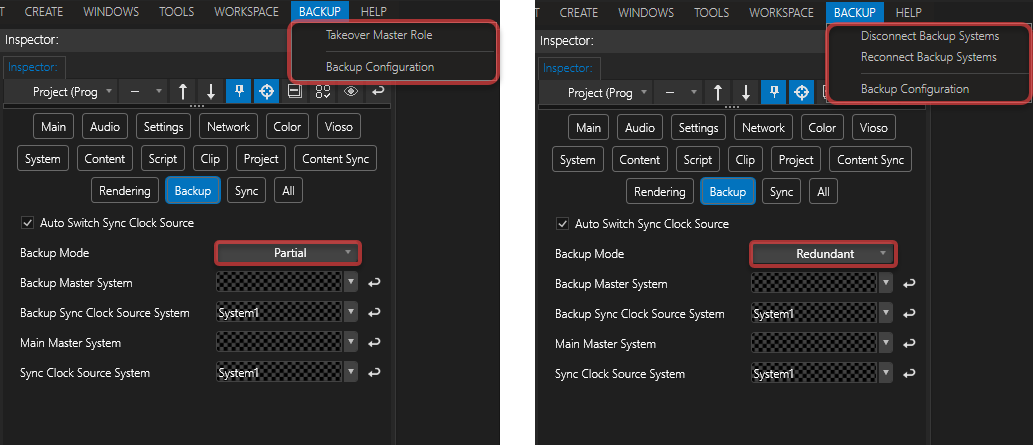
Depending on the selected mode, the menu entries for Backup in the main menu will change.
Partial Backup
Master System Backup
Every system in your project - including a backup session member - can take over the master role.
How to take over:
1.Via the UI
Go to the Session Member System that should take over the master role,
Go to Backup tab of the Main Menu there and select "Takeover Master Role"
The Session Member switches its role to Master and the former master ( if still alive) will become a Session Member.
2. Use a Script Command
SystemsManager.BackupTakeOverMasterRole
This script command can only be triggered from the local system and externally via VERTEX API.
 Sync-Clock Source System
Switching the Master role will not change the Sync Clock Source System of a project.
If the former Master is defined as the Sync Clock Source System and is still active, it will keep this function.
If the former Master is inactive or offline, the Backup Sync Clock Source System that is defined in the Project Settings will take over this function.
Please keep this in mind, if you want to change both the Master as well as the Sync Clock Source System. You can do this with an additional script command in a backup script.
Session Member Backup
Your Session Member backup system is already part of your network in a similar role: as just another Session Member.
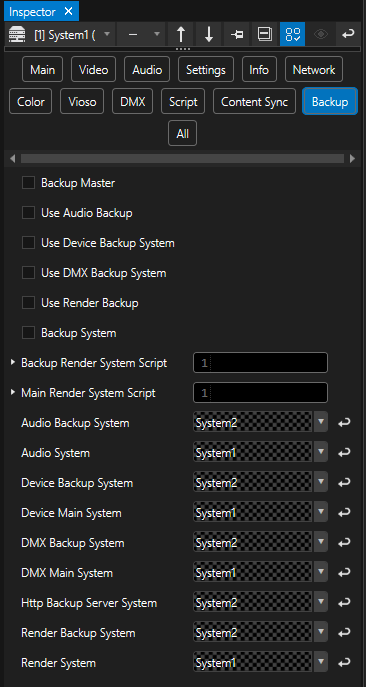
Each VERTEX system has got in the Inspector a Backup tab, visible in advanced mode.
Here, you can set all main systems and for various tasks and their backup systems - similar to the Backup Configuration window.
This means that in a non-backup scenario it is possible for a system to outsource its e.g. rendering task.
In a backup scenario, if one system fails, another Session Member can take over the tasks for video rendering or audio playback,
if it has got the same number of outputs in the same resolution.
Setting Backup Systems In The Inspector:
System1 renders video and System2 should be the backup.
Select System1 in the inspector.
Change the Render Backup System property by drag and drop of System2 from the project explorer. Alternatively, use the drop-down or context menu for a selection of all available systems.
The same workflow applies to audio systems etc.
Setting Backup Systems By Script Commands
// Set System2 as Render and Audio Backup for System1
System1.Settings.RenderSystem.Value = System2
System1.Settings.AudioSystem.Value = System2
Redundant Backup
Backup Group
a live group consists of
•live master
•number of live session members
a backup group consist of
•backup master
•number of backup session members
Backup groups can have one of the following two states:
1.Connected:
All changes on the live system are pushed to the backup system.
When connected, the project state from backup master will be overwritten with the project state from live master.
Use to update your backup group to the newest project changes. The project state on backup master is overwritten and updated.
When connected, the live master also acts as master for all members of the backup group.
2.Disconnected:
If the backup group is disconnected, both groups - live and backup - act autonomous.
The live master controls all session members of the live group.
The backup master controls all session members of the backup group.
Changes on the live group will not be pushed to the backup group.
The project state of the backup group corresponds to the time when the groups were separated.
Define Members for Backup Group
1.Add all systems as session members to your Project.
2.Switch Backup Mode in your project settings to "Redundant".
3.Select Systems in the Inspector and enable the following:
Backup Master: if enabled, this system will become master of the backup group.
Backup System: enable Backup System for all Session Members of the Backup Group
Use Audio- / Device- / DMX- / Render Backup: enable to use the backup for specific task.
 Please take care, that all members of a Backup Group have assigned the Content they need to play back.
When distributing content exclusively to certain Target Systems, please check your system's content settings in the Inspector.
Connect and Disconnect Backup Group
1.Via User Interface
Go to Main Menu > Backup Tab
Disconnect or Reconnect backup systems
2.Script Command
SystemsManager.BackupGroupReconnect
Systemsmanager.BackupGroupSeparate
This Script Command can only be executed on the local System and over the VERTEX API.


